Window Well Cover Maintenance: Cleaning, Repairs, and Seasonal Care in Minneapolis
A window well cover only works if you keep it working. Window well cover maintenance is a short list of simple tasks, but skipping them is how Minneapolis homeowners end up with a flooded well during the March thaw or a cracked cover under February ice. This guide walks you through the full routine step by step: cleaning, inspecting, re-sealing, repairing, and timing the work around Minnesota's seasons. If you are handy enough to compare DIY against hiring it out, you can do almost all of this yourself in an afternoon.
One note before you start. The cover is the last line of defense, not the first. If your well has no drain underneath or the well itself is pulling away from the foundation, maintenance on the cover alone will not stop water. We will flag where that line sits as we go.
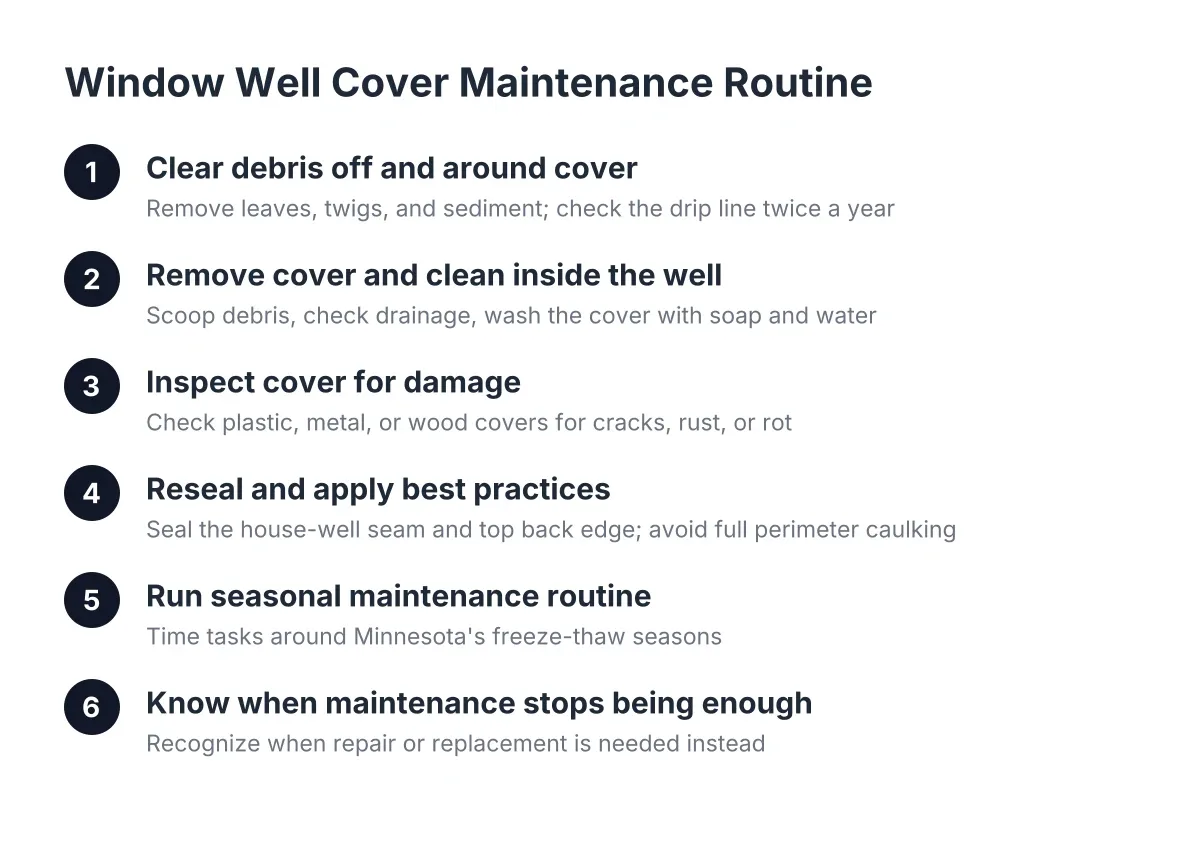
Step 1: Clear Debris Off and Around the Cover
Start with the easy part. Pull leaves, twigs, pine needles, and sediment off the top of the cover and away from its edges. In Minneapolis, cottonwood fluff in June and oak leaves in October are the usual suspects. Debris traps moisture against the cover, and on clear polycarbonate it blocks the natural light that was half the reason you bought the cover.
Next, check the drip line above the well. Covers work best when they sit just under the overhanging siding, so rainwater running down the house drains past the cover instead of collecting behind it. If soil or mulch has built up along the back edge where the cover meets the foundation, pull it back. Water pooling there will find its way behind the well eventually.
Do this twice a year at minimum: once after spring melt and once after leaf drop. Add a quick pass after any major storm.
Step 2: Remove the Cover and Clean Inside the Well
Lift or unfasten the cover and set it aside. Even a well-fitted cover lets some fine debris in over a year. Scoop out leaves, trash, and anything that has blown through gaps. If your well has a gravel or river rock floor, rake it level and check that it still drains; pour a bucket of water in and watch. Standing water after ten minutes means the drain or the gravel bed is clogged, and that is a problem no cover will fix.
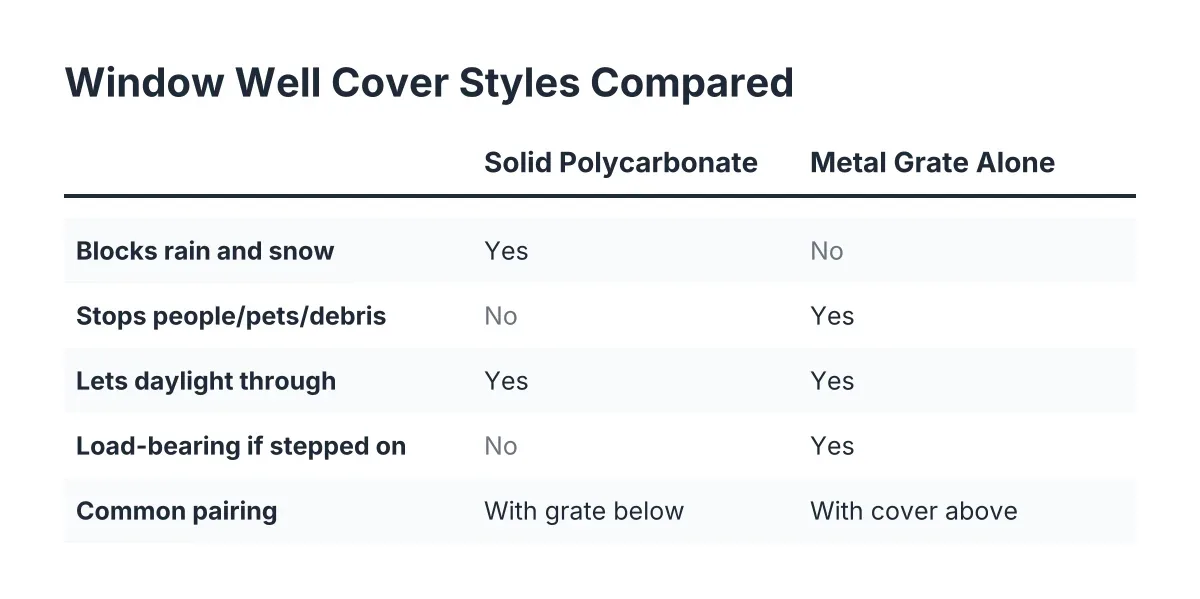
While the cover is off, wash it. Clear polycarbonate bubble covers fog up fast from dirt film, and a bucket of soapy water plus a soft brush restores most of the light. Skip abrasive pads; they scratch plastic covers permanently. For metal grate covers, brush off rust spots and hose them down.
This is also the moment to check the basement window itself. If you have older glass block or block windows down there, look for cracked or foggy blocks and mortar gaps. A cover keeps debris and rain off the window, but it cannot fix a block window that has already failed.
Step 3: Inspect the Cover for Damage That Needs Repair
With the cover clean, inspect it in good light. Here is what to look for by material:
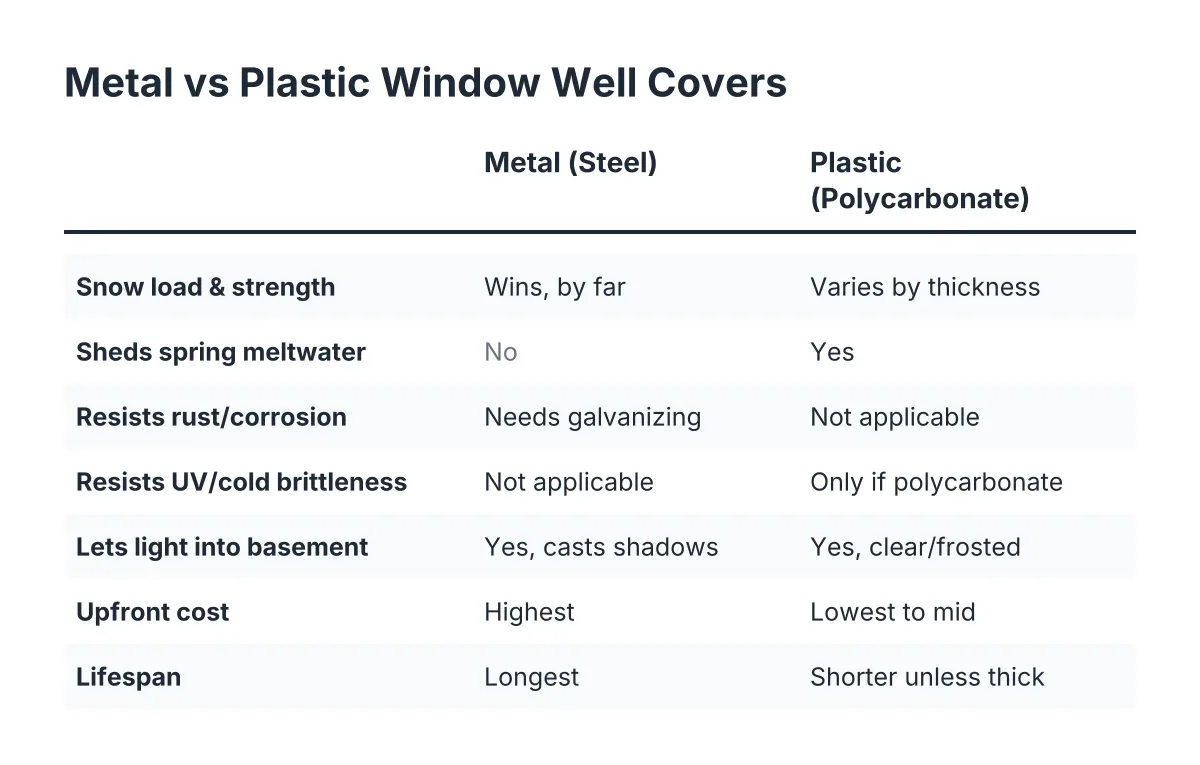
- Plastic and polycarbonate covers: cracks radiating from fastener holes, yellowing or brittleness from UV exposure, and warping that leaves gaps at the edges.
- Metal grate covers: rust at welds, bent bars from someone stepping on them, and loose or missing anchor points.
- Wood window well covers: rot at the corners, soft spots where water sits, and fasteners pulling out of swollen lumber. Wooden window well cover frames take the most seasonal abuse in Minnesota because wood swells and shrinks with every freeze-thaw cycle.
Small cracks in polycarbonate can be stopped with a drilled hole at the crack tip and exterior-grade sealant, which is a fair DIY window well cover repair. A shattered bubble, a rusted-through grate, or rotted wood framing means replacement. A cracked cover that collapses under snow load can break the basement window below it, and then you are comparing a $20 tube of sealant against a window replacement.
If the cover no longer fits the well, measure before you buy. Window well cover sizing is where most DIY replacements go wrong. Covers should extend past the well opening on all sides so rain runs off over the edges instead of pooling, and standard sizes do not fit every older Minneapolis well. Measure width, projection from the house, and well shape, then decide between a standard cover and a custom one.
Step 4: Best Practices for Window Well Cover Maintenance and Resealing
Sealant is the part of window well cover maintenance that most homeowners either skip or overdo. Here is the middle path that works.
First, run a bead of exterior waterproof sealant along the seam where the well itself meets the house. This joint, not the cover, is where dirt and water sneak behind the well and under the window. Check it every year; caulk in Minnesota rarely lasts more than a few seasons.
Next, seal the cover itself, but only along the top back edge where it meets the foundation. Do not caulk the entire perimeter. You will need to remove the cover again next season for cleaning and egress access, and a fully sealed cover fights you the whole way. For the same reason, go easy on fasteners. A few screws into the well flange or foundation anchors hold a cover through a Minneapolis winter; a dozen screws just make spring removal miserable.
One exception matters here. If the well sits over a bedroom egress window, the cover must open or lift from the inside without tools. Minneapolis code requires each bedroom below the fourth floor to have a window at least 20 inches wide by 24 inches high with nothing blocking it, according to the City of Minneapolis. Screwing an egress cover down permanently can turn a code-compliant finished basement into a code violation, and it is the kind of detail a rental inspection or home sale will catch.
Step 5: Run the Seasonal Window Well Cover Maintenance Routine
Minneapolis weather sets the calendar. Suppose a homeowner in South Minneapolis skips the fall check; by late March, a cover edge heaved by frost has a half-inch gap, snowmelt pours in faster than the well can drain, and water finds the window sill. In that scenario, fifteen minutes of fall maintenance would have beaten a weekend of wet-vac work.
Here is the routine by season:
- Fall (October): Clear leaves, confirm the cover sits tight with no gaps, and refresh the sealant bead at the house seam before the first hard freeze.
- Winter (as needed): Brush heavy snow off plastic covers after storms over six inches. Snow load is the top cause of cracked bubble covers in Minnesota. Never chip ice off polycarbonate with a shovel edge; let it melt or use warm water.
- Spring (March or April): Remove the cover, clean the well, test drainage with a bucket of water, inspect for freeze-thaw cracking, and wash the cover before reinstalling.
- Summer: A quick visual check after major storms is enough.
If you only do two of these, do fall and spring. They bracket the freeze-thaw season that does the real damage.
Step 6: Know When Maintenance Stops Being Enough
Some problems live outside the cover. If the well fills with water even with a sound, well-sealed cover, the drain under the well is likely clogged or was never installed. If there is no drain, a solid cover is the right stopgap because it keeps rain from collecting, but the long-term fix is drainage. Additionally, if the well itself is rusting through, bowing, or separating from the foundation, you are looking at well replacement, not cover repair. According to HomeAdvisor, window well replacement averages about $2,200, with most homeowners spending between $1,800 and $3,000, so it is worth catching early while the fix is still a tube of sealant.
The DIY math is honest here. Cleaning, sealing, and swapping a standard cover are weekend jobs with hardware store materials. Custom window well covers for odd-sized older wells, egress code questions on a finished basement, drainage problems, or a galvanized well that needs replacement are where a local installer earns the money, because mistakes at the foundation line show up as water intrusion and mold months later. When the fix touches the well structure, the drain, or the window opening itself, get a professional opinion before you commit; a free quote costs nothing and settles the DIY-versus-hire question with real numbers instead of guesses.
Keep up the routine and a decent cover will outlast several Minnesota winters. Let it slide, and the spring melt will remind you why the routine exists.
If you need basement egress window installation, Minneapolis Window Pros can help.
Prefer to talk it through? Call (612) 482-9787 — a quick call is usually the fastest way to get a straight answer for your situation.