Basement Window Well Water Drainage: Stop Minneapolis Freeze-Thaw Damage
If you are finishing your basement, basement window well water is the problem to solve before drywall goes up, not after. The key to protecting your finished space is establishing proper window well drainage before interior work begins. Minneapolis freeze-thaw cycles turn a wet window well into a slow-motion wrecking ball. Water that pools in the well in October freezes in November, expands against the foundation and the window frame, then melts in March and looks for a way inside. If that water finds your new carpet and framed walls, you are redoing finished work, not just fixing a window.
This guide walks through the drainage work step by step, in the order it should happen during a basement finishing project. Most of these steps are within reach for a handy homeowner. A few are not, and I will flag those honestly so you can decide where your weekend labor ends and a pro begins.
Why Basement Window Well Water Gets Worse in Minneapolis
Freeze-thaw cycling is the reason a basement window well holding water is a bigger deal here than in milder climates. Minneapolis soil freezes deep in winter. Frozen ground will not absorb meltwater, so snowmelt and early spring rain collect in the well with nowhere to go. The well becomes a bucket pressed against your foundation.
Ice makes it worse. Water that freezes inside the well expands, which can bow a well liner, crack mortar joints around old block windows, and push gaps open along the foundation seal. Each cycle widens the path for the next round of water. That is why a basement window well filling with water once a year in spring is an early warning, not a quirk to live with.
For a finished basement, the stakes change. Before finishing, a leaky well means a puddle on concrete. After finishing, it means wet insulation, swollen trim, and mold behind drywall you cannot see into. Fix the drainage first. Here is the sequence.
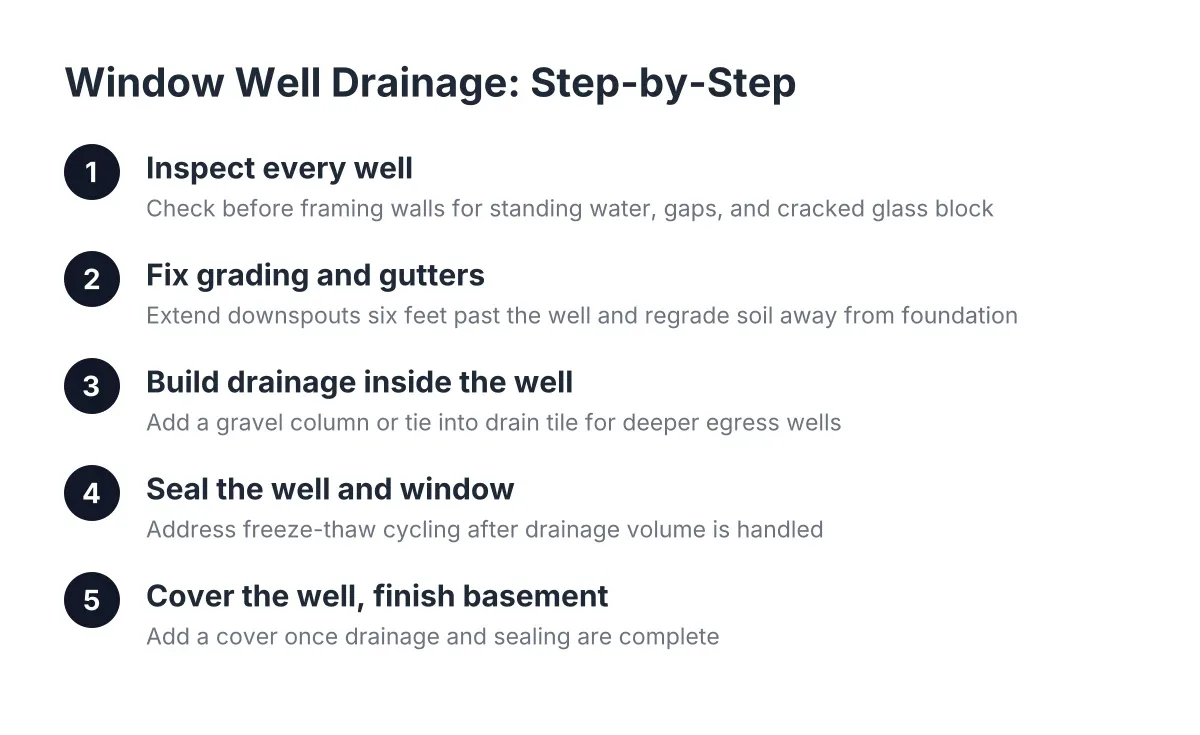
Step 1: Inspect Every Well Before You Frame a Single Wall
Start the inspection before basement finishing work begins, while the foundation walls are still exposed. Pull any covers and look at each well after a hard rain or during snowmelt. You are checking three things:
- Standing water or waterline stains inside the well, which show how high water has pooled
- Gaps where the well liner meets the foundation, including rusted-out fasteners on older galvanized wells
- Cracked or foggy glass block, rotted wood frames, or efflorescence (white mineral residue) on the block below the window
Also note the depth. A window with its sill close to grade rarely needs serious drainage work, since standing water is unlikely at that depth. A deeper well, like the kind required for an egress window, needs real drainage because it sits well below the surrounding soil line.
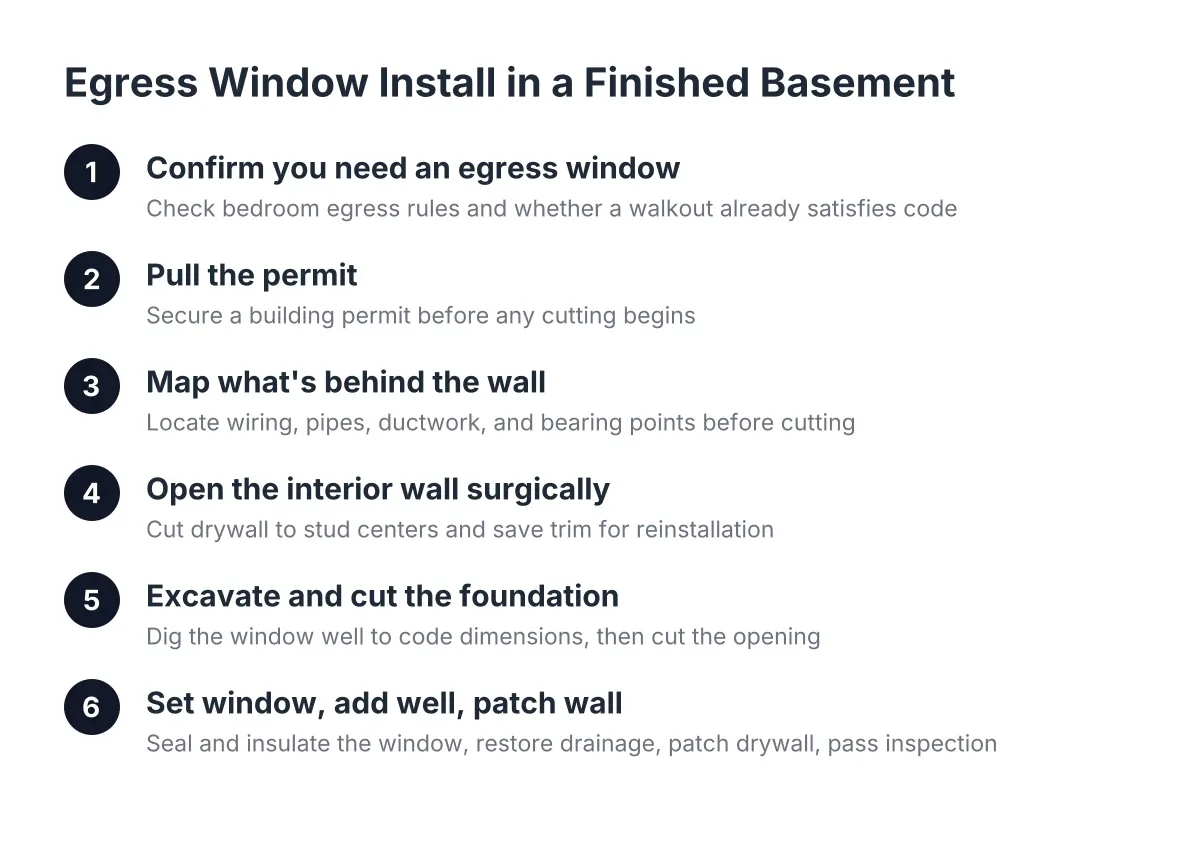
Write down what you find for each opening. If you are planning a bedroom down there, this is also the moment to check code. Minneapolis code requires each bedroom below the fourth floor to have a window at least 20 inches wide by 24 inches high with nothing blocking it, according to the City of Minneapolis. If an old block window is going to become a bedroom egress window, the well will get deeper, and drainage becomes mandatory, not optional.
Step 2: Fix the Grading and Gutters That Feed the Well
Next, cut off the water supply. Most basement window well water starts as roof runoff and surface flow, not groundwater. Before you touch the well itself, handle the cheap fixes:
- Extend downspouts at least six feet past the well, and never let one discharge uphill of a window well.
- Regrade the soil so it slopes away from the foundation on all sides of the well. Even a few inches of fall over the first six feet helps.
- Check for settled soil or old landscape edging that traps water against the house and move it.
This step is pure DIY territory. A shovel, a downspout extension, and an afternoon solve more wet-well problems than any product you can buy. Suppose a homeowner in a 1960s Minneapolis rambler finds two inches of water in the well every April. In that scenario, the fix is often a downspout dumping eight feet away instead of right beside the well, plus a wheelbarrow of soil to restore the slope. Total cost: under a hundred dollars in materials, as a rough estimate.
Step 3: Build Drainage Inside the Window Well
If water still collects after grading is fixed, the well itself needs a drain path. The standard approach is a gravel column. Dig out the bottom of the well, go down another foot or two, and fill the hole and the base of the well with clear drainage stone up to a few inches below the window sill. Clean stone, not pea gravel mixed with soil, is what lets water fall through instead of ponding.
On deeper wells, especially egress wells, the better answer is a drain pipe that runs from the well floor down to the drain tile system at the footing level. That pipe gives basement window well water a permanent exit into the same system that protects the rest of your foundation, often ending at a sump pump. This is where DIY gets hard. Tying into drain tile means excavating along the foundation or working from inside through the slab, and getting it wrong can send water toward the house instead of away.
Here is the honest line for the DIY-curious: the gravel column is a weekend job. The drain tile connection usually is not, and if your well fills from the bottom up even in dry weather, you may have a high water table that needs a waterproofing contractor, not a window installer. A basement window well filling with water from below is a different problem than one filling from above.
Step 4: Seal the Well and Window Against Freeze-Thaw
Drainage handles volume. Sealing handles the sneaky paths water takes during freeze-thaw cycles. Work through these points:
- Run a continuous bead of polyurethane sealant where the well liner meets the foundation, from the bottom of the well to the top. Gaps here let soil and water migrate behind the well.
- Caulk the perimeter of the window frame where it meets the masonry, inside and out.
- If the window is being replaced during the project, make sure the sill detail slopes outward so any water that gets behind the frame drains away from the opening instead of into the wall.
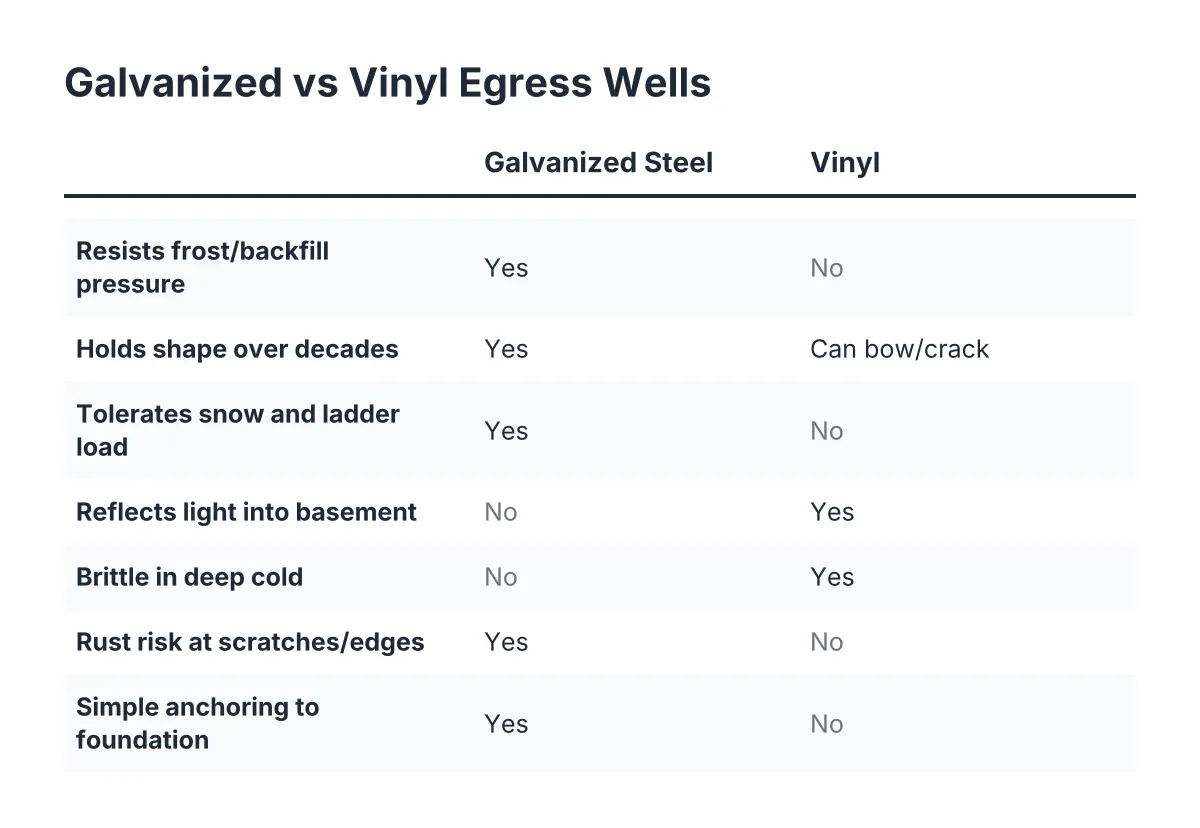
Timing matters in Minneapolis. Sealants want temperatures above roughly 40 degrees to cure, so plan this work for the warm months, not a November scramble. In addition, if your old wells are rusted or deformed from ice pressure, sealing them is wasted effort; replace the well first. Window well replacement averages about $2,200, with most homeowners spending between $1,800 and $3,000, according to HomeAdvisor.
Step 5: Cover the Well, Then Finish the Basement
A fitted cover is the last line of defense and the cheapest insurance you can put over a well. A clear or frosted polycarbonate cover sheds rain and snow, keeps leaves from clogging your gravel, and still lets daylight reach the basement. Caulk the cover's mounting edge where it meets the house so wind-driven rain cannot sneak behind it. On an egress well, choose a cover that opens from inside without tools; a bedroom escape route cannot be bolted shut, and code compliance depends on it.
Only after Steps 1 through 4 are done should the finishing work proceed. Sequence matters because window and well work is disruptive. Cutting a larger egress opening or replacing block windows means concrete dust, excavation at the foundation, and sometimes interior framing changes. Doing that after drywall and flooring are in is how budgets blow up. If you plan to rent the space, know that the Minneapolis Rental Property Checklist requires a proper egress window or door that opens to the outside for each bedroom, per the City of Minneapolis, so the well and window sizing must be settled before layout decisions lock in.
As a planning figure, adding an egress window and well runs about $3,900 on average, according to Angi, while a window well alone costs $500 to $1,500 or more. Pricing varies by project, and a local installer can give you a free quote based on your actual openings; what matters for this guide is that the number lands in your budget before the framing lumber does.
What DIY Covers and Where a Pro Earns the Fee
Grading, downspouts, gravel, caulk, and covers are honest DIY work, and doing them yourself leaves more budget for the windows. Cutting foundation openings, setting an egress window, installing the well to depth, and tying drainage into drain tile are the hard parts. A mistake there risks the foundation seal, a failed inspection, or water intrusion behind your new finished walls.
A practical split for the budget-minded: do Steps 1, 2, and 5 yourself, do Step 4 yourself if the wells are sound, and get quotes for Step 3 when a drain tile connection is involved. That way you pay for the work that genuinely requires excavation experience and code knowledge, and nothing else. However you divide it, handle the water before you handle the drywall. Dry wells are what let finished basement windows stay bright, dry, and boring for the next twenty springs, which is exactly what you want from them.
If you need basement egress window installation, Minneapolis Window Pros can help.
Prefer to talk it through? Call (612) 482-9787 — a quick call is usually the fastest way to get a straight answer for your situation.