Egress Window Well Installation in Minneapolis: Steps and Depth Requirements
Planning to finish your basement? Get the windows right before the drywall goes up. Egress window well installation is the step Minneapolis homeowners most often plan wrong, and it is the one that decides whether your basement bedroom passes inspection, drains properly in a spring storm, and stays dry for the next twenty years. Understanding the window well depth requirements that matter in Minneapolis clay soil and frost is essential to getting this step right. This guide walks through the process step by step, including best practices for ensuring compliance.
Here is why sequence matters. If you frame and finish the basement first, then discover a bedroom needs an egress window, you tear out finished work to cut concrete. If you install the well too shallow, water pools against your foundation and comes in through the very window that was supposed to make the space safe. Do the window work first, and do the digging right.
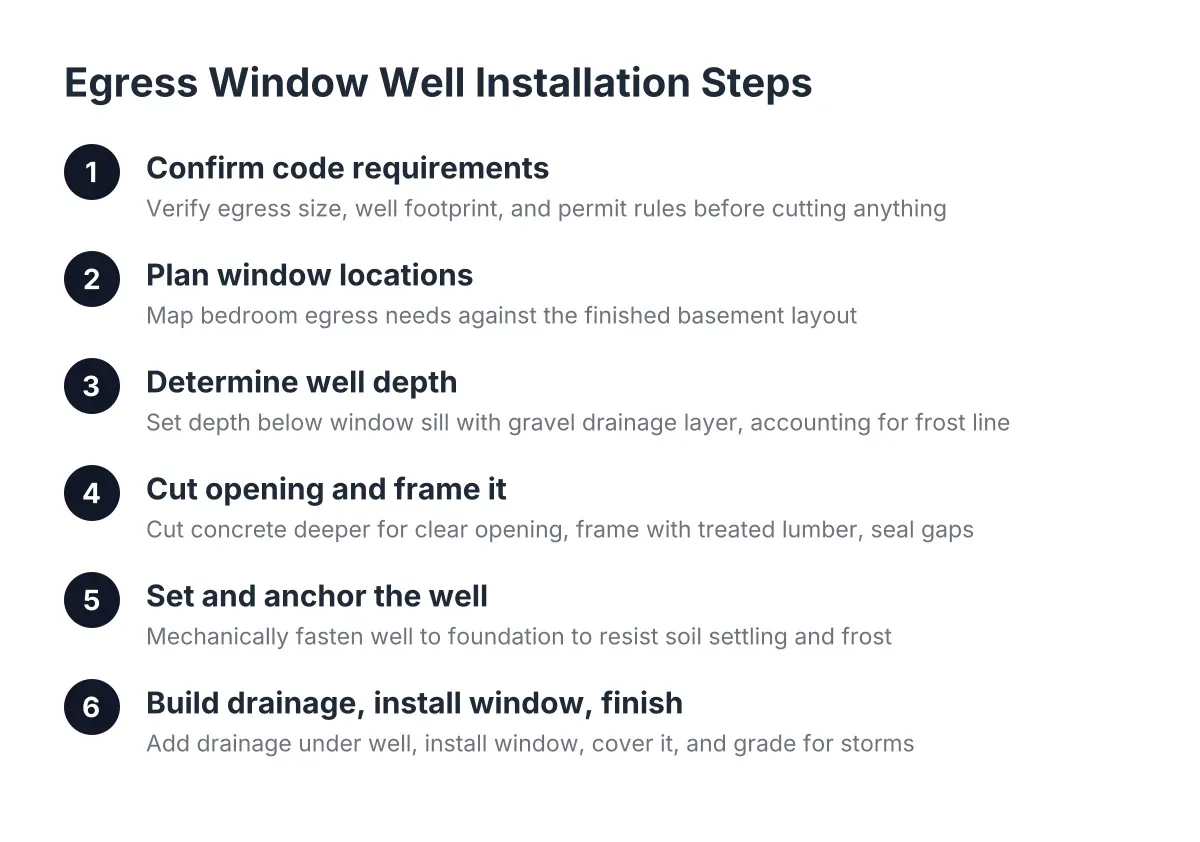
Step 1: Confirm What Code Requires Before You Touch Anything
Start with the rules, because the rules decide the size of the hole. In Minneapolis, any basement room used as a bedroom needs a code-compliant egress window. According to the City of Minneapolis, each bedroom below the fourth floor must have a window at least 20 inches wide by 24 inches high, with nothing blocking it. The City of Minneapolis rental checklist also requires that a proper egress window or door open to the outside, which matters if you plan to rent the finished space.
The well itself has requirements too. Per HomeAdvisor, IRC egress code calls for a window well that projects at least 36 inches from the house, has a footprint of nine square feet, and pairs with a window offering a minimum net clear opening of 5.7 square feet. Most existing Minneapolis basement windows fall short of that opening, which is why basement window replacement is usually part of the job, not an add-on.
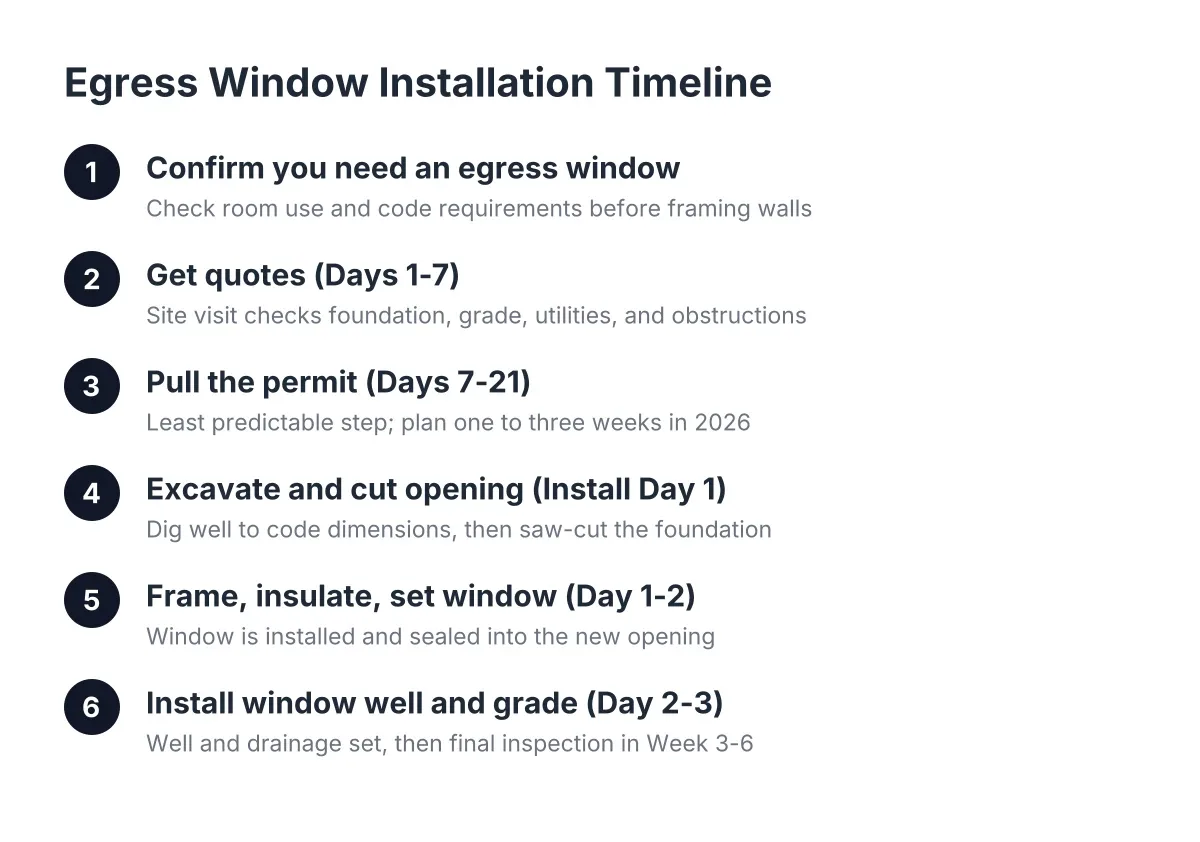
In addition, pull your permit before any concrete gets cut. Basement finishing permit window requirements are checked at inspection, and an inspector will measure the opening, the well, and the ladder if the well is deep. Skipping the permit to save time is the most expensive shortcut in this whole project.
Step 2: Plan Window Locations Around the Finished Layout
Next, sketch your finished basement floor plan before you pick window spots. Decide where the bedroom walls will go, because the bedroom egress requirement attaches to the room, not the house. One egress window in the family room does not cover a bedroom on the other side of a wall.
For example, say a homeowner near Lake Nokomis plans a basement bedroom and a small office. The bedroom needs its own egress window. The office may only need a smaller window for light, and a glass block unit or block windows might serve a laundry area better than an operable window. Planning window installation for finished basements this way, room by room, keeps you from cutting more concrete than the project needs.
Also check what is outside each proposed location. A gas meter, an AC condenser, a deck footing, or a property line setback can rule out an otherwise perfect wall. A local installer who knows Minneapolis lots will flag these conflicts before the saw comes out.
Step 3: Understanding Window Well Depth Requirements for Your Excavation
Now the part most people underestimate: the hole. Before excavation starts, measurements get verified against the planned well size, and the foundation around the opening gets inspected. The new well extends farther from the house than any existing opening, so the excavation is wider and deeper than homeowners expect.
Depth is the detail that separates a dry basement from a wet one. The well must sit below the bottom of the new window, with room under that for a drainage layer of gravel. In Minneapolis, frost depth also shapes the plan; soil here heaves when it freezes, and a well set without accounting for that can shift, tilt, or pull away from the foundation over the years. Proper window well depth requirements account for both the window opening and the frost line—these measurements working together are what keeps your basement dry for decades.
Keep the base of the excavation level and stable. The well structure and its gravel bed sit on that base, and a sloppy base means a leaning well later. One practical note: excavation holes in our clay soil can fill with water fast during digging, especially in spring. A typical crew brings muck boots for a reason.
Step 4: Cut the Opening and Frame It
With the hole dug and the well dimensions confirmed, the concrete gets cut. In most Minneapolis basements, the opening gets cut deeper rather than wider, dropping the sill low enough to fit a window with a compliant clear opening. This is loud, dusty work, and it is the point of no return, which is exactly why steps 1 through 3 come first.
After the cut, the opening gets framed with treated lumber and sealed. Spray foam insulation around the frame closes air gaps that would otherwise frost up in January. If you are framing the rest of the basement at the same time, the same material logic applies elsewhere; according to This Old House, the bottom plate of a basement wall must be pressure-treated lumber because it contacts the concrete slab.
Step 5: Set the Well and Anchor It to the Foundation
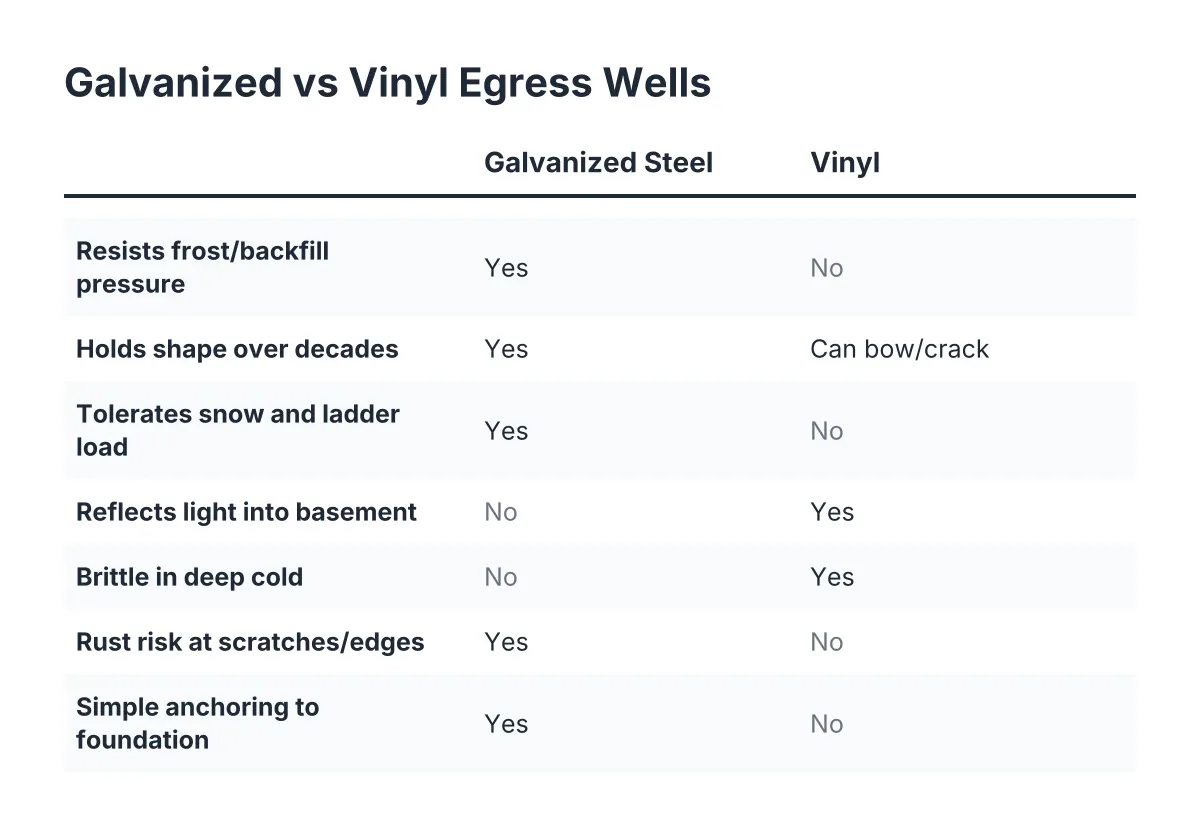
The well goes in next. Galvanized egress window wells are the common choice here because they handle freeze-thaw cycles without cracking. Whatever the material, the well must be mechanically fastened to the foundation wall. A well that just leans against the house will separate as soil settles and frost pushes on it, and the gap it leaves becomes a water path straight to your window.
Backfill goes in around the outside of the well in stages, compacted as it goes. Loose backfill settles unevenly and pulls the well out of position within a few seasons.
Step 6: Build Drainage Under the Well, Not Just Around It
This step is for every homeowner who has watched water pour in through a basement window during a storm. A window well without drainage is a bucket bolted to your house. Rain and snowmelt collect in it, rise to the sill, and come inside. If your basement flooded through a window well last spring, missing or clogged drainage is the most likely cause.
Proper egress window well installation includes a drain at the base of the well. The drain pipe runs deep enough to tie into the weeping tile system below the basement floor, so water leaving the well has somewhere to go besides your carpet. On top of the drain sits a gravel layer that lets water pass through instead of pooling.
A quick checklist for drainage that actually works:
- A drain at the base of the well, tied into the drain tile below the floor
- Several inches of clean gravel above the drain
- Backfill compacted so it does not settle into a low spot
- Final grading that slopes soil away from the well and the foundation
Step 7: Install the Window and Finish the Interior
With the well set and drained, the egress window itself goes in. The unit gets leveled, shimmed, fastened, insulated, and sealed. Casement and slider styles both work for egress windows in basements as long as the net clear opening meets code; the right choice depends on the opening size and how the room lays out.
Then the interior gets finished around it. If this window serves a future bedroom, keep furniture and built-ins clear of it. Finished basement windows only satisfy the bedroom egress requirement if a person can actually open them and climb out, so nothing can block the opening.
Step 8: Add a Cover and Grade for the Next Storm
Finally, protect the work. A window well cover keeps rain, snow, and leaves out of the well, and a bead of caulk around its edge helps keep water from ever reaching the window. In Minneapolis, a cover also keeps three feet of March snowmelt from filling the well. Just confirm the cover can be opened from inside without tools, since a bolted-down cover defeats the escape purpose.
Grade the soil so it slopes away from the well and the house. Most window leaks blamed on the window are grading and drainage problems wearing a window costume.
What Egress Window Well Installation Costs to Plan For
Egress window well installation costs vary by dig depth, soil conditions, foundation thickness, and window size, so treat published averages as a starting point rather than a quote. According to Angi, adding an egress window and well runs about $3,900 on average. HomeAdvisor puts the average cost of installing an egress window at $4,229, with most homeowners spending between $2,723 and $5,877.
Your project may land above or below those national figures. Deep frost footings, hard clay, or a finished exterior all move the number. As of 2026, the honest answer is that pricing varies by project, and any installer worth calling should walk your basement and give you a real quote, free, before you commit.
When to Bring in a Local Installer
Some of this project is within reach for a capable homeowner, and some of it is not. Cutting a structural opening in a foundation wall, tying a drain into the weeping tile, and passing a Minneapolis egress inspection are jobs where a mistake costs more than the labor you saved. If your foundation shows cracking near the planned opening, or water is already coming in, get a professional assessment before anyone digs.
The sequence, though, is yours to control either way. Windows first, permit in hand, well dug to depth, drain tied in, then finish the basement around it. Homeowners who plan egress windows for their basements in that order finish once. The ones who finish first and cut later pay for the basement twice.
If you need basement egress window installation, Minneapolis Window Pros can help.
Prefer to talk it through? Call (612) 482-9787 — a quick call is usually the fastest way to get a straight answer for your situation.