Egress Window Installation in a Finished Basement: Protect Your Drywall and Framing
Planning an egress window finished basement installation raises a question that an unfinished basement never does: how do you cut a bigger hole in a concrete wall without wrecking the drywall, framing, and trim you already paid for? The honest answer is that the window itself is the easy part. The planning around it, especially in Minneapolis homes with older block foundations, is what keeps the project from turning into a drywall repair project. This guide walks through the steps in the order a careful crew would take them, so you can sequence the work correctly the first time, whether you hire it out or handle parts yourself.
One note up front. If your basement is already finished and you are adding an egress window after the fact, the order of operations matters even more than the cutting technique. Most of the avoidable damage happens when homeowners start cutting concrete before they have mapped what sits inside the wall.
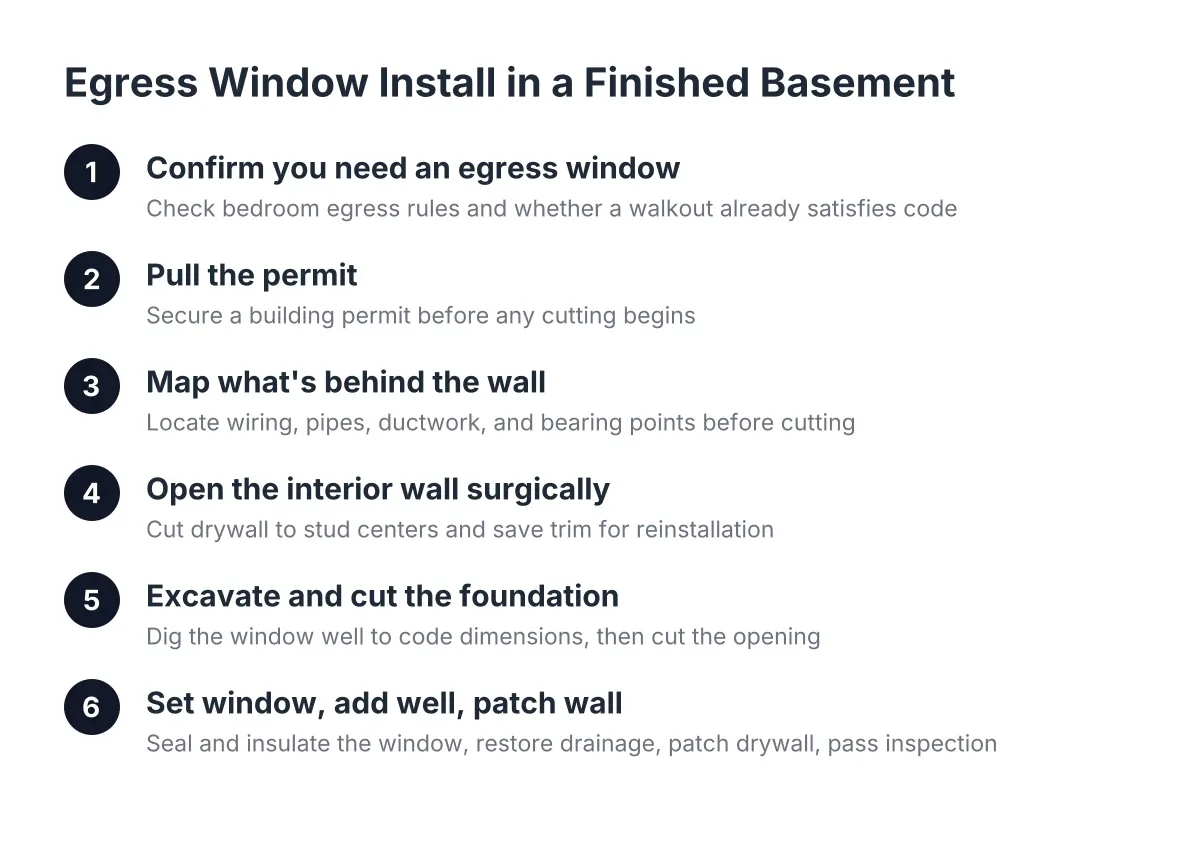
Step 1: Confirm Whether You Actually Need an Egress Window for Your Finished Basement
Start by checking what the room will be used for, because the bedroom egress requirement is what triggers most of these projects. A basement bedroom needs a code-compliant escape route. In Minneapolis, the city's Rental Property Checklist specifies that a proper egress window or door must open to the outside for each bedroom, per city code, according to the City of Minneapolis. If you plan to rent the basement, this is not optional.
Under the IRC, an egress window needs a minimum net clear opening of 5.7 square feet, and the window well must project at least 36 inches from the house with a nine square foot footprint, according to HomeAdvisor. Measure your existing basement window against that number. Most older block windows and small hopper windows fall far short.
However, there is one common exception. A walkout basement with a door to grade can satisfy the egress requirement for a bedroom without a separately installed egress window. If you have a walkout, you may only need basement window replacement for light and comfort, which is a smaller and cheaper project.
Step 2: Pull the Permit Before Anything Else
Next, get the permit squared away before a saw touches concrete. Egress work involves cutting a structural opening in your foundation, and in Minneapolis that means a building permit and inspections. This is also where DIY plans often stall. An inspector will check the net clear opening, the well dimensions, and the ladder if the well is deeper than 44 inches.
For a finished basement headed toward rental use, the permit record matters at resale and at rental licensing. An unpermitted egress window can fail a rental inspection even if the window itself is fine. If you are comparing DIY against a pro quote, fold permit handling into that comparison; a local installer who pulls egress permits regularly knows what the Minneapolis inspector expects to see.
Step 3: Map What Is Hiding Behind the Finished Wall
Before cutting, figure out what runs through the wall section you plan to open. This is the step that separates a clean egress window installation in a finished basement from a demolition surprise. Typical finished basement walls in pre-1990 Minneapolis homes have rigid foam against the foundation, a stud wall in front of it, and wiring pulled through the studs.
Check for these before you commit to a location:
- Electrical runs and receptacle boxes inside the stud bay you plan to remove
- Water lines, gas lines, or ductwork crossing the wall section
- The main beam, posts, or point loads bearing near the opening
- Exterior obstacles: gas meter, AC condenser, deck footings, or property line setbacks
- Grade height and drainage path for the window well outside
For example, suppose a homeowner in South Minneapolis plans to put the new egress window on the back wall, then finds the electrical panel feed runs through that exact stud bay. Moving the window three feet over, into a clear bay, costs nothing at the planning stage. Discovering it mid-cut means rerouting wire, patching drywall across two bays, and repainting the wall.
Step 4: Open the Interior Wall Surgically, Not Broadly
Remove only the finished wall section you need, plus a workable margin. A typical approach is to cut the drywall back to the nearest stud centers on each side of the planned opening, since basement stud walls are framed 16 inches on center with seams landing on studs, as Fine Homebuilding notes. Cutting to stud centers means the patch later screws to solid backing instead of floating.
Score the drywall with a knife rather than tearing it, and save the baseboard and trim in one piece if you can. Label it. Reinstalling original trim beats matching a 30-year-old profile at the lumberyard.
In addition, expect to rebuild part of the stud wall around the new, larger opening. The bottom plate in that section must be pressure-treated lumber where it contacts the concrete slab, according to This Old House. If the framing crew ties new studs into the existing wall cleanly, the drywall patch stays small and the seams land where tape hides them.
Step 5: Excavate and Cut the Foundation From the Outside
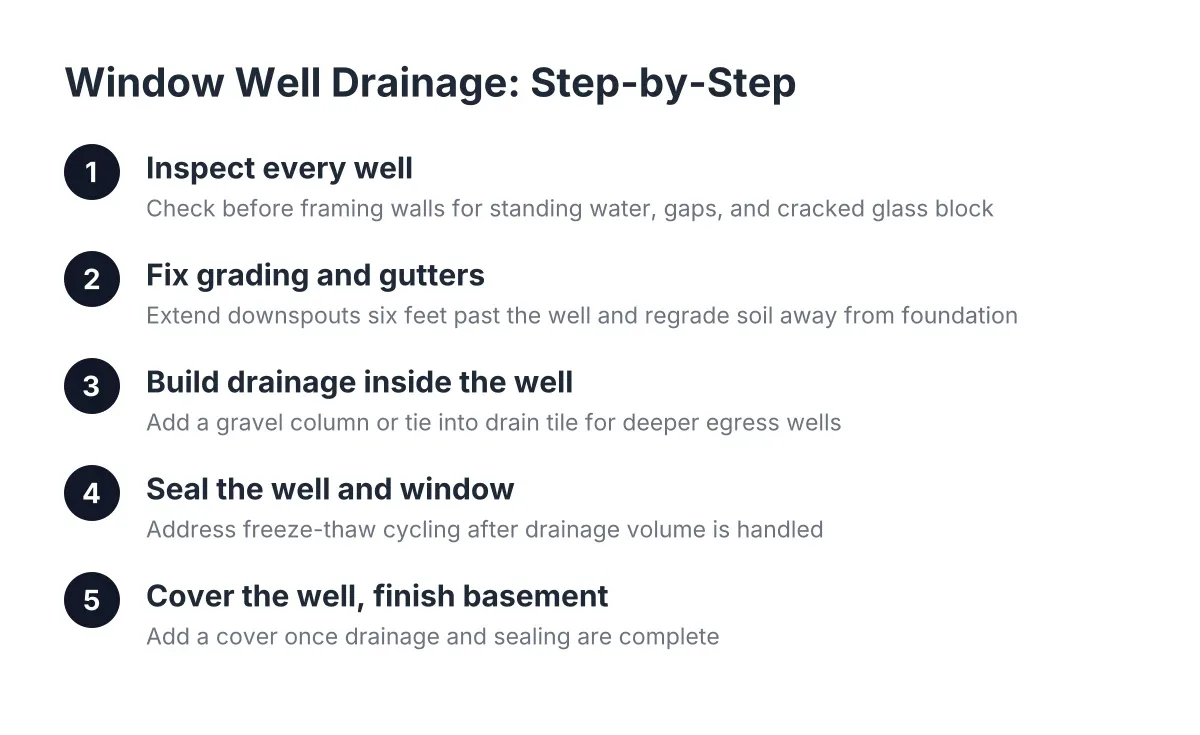
Dig the well hole before cutting the wall, and dig it to meet code dimensions first. The excavation has to accommodate a well that projects at least 36 inches from the foundation, plus drainage below the well floor. In Minneapolis clay soil, that hole holds water if you skip the gravel base, and frost depth here punishes shortcuts on drainage.
Cutting the opening is where egress projects differ from ordinary window replacement. Most egress cuts go deeper rather than wider, dropping the sill of the existing opening down through the block or poured wall. A concrete saw, proper shoring judgment, and dust control matter here. This is the single step where most homeowners who are handy at carpentry draw the DIY line, and for good reason; a bad cut in a block wall is not a patch-and-paint fix.
This is also the step where a professional earns the quote. Nationwide, egress window installation costs average $4,244, with most homeowners spending between $2,723 and $5,898 per window, according to Angi. Pricing varies by project, and foundation type, well depth, and interior finish work all move the number.
Why Cutting Into a Finished Basement Changes the Plan
Cutting from outside keeps concrete dust, slurry, and vibration damage away from finished surfaces. However, the crew still needs interior access to catch the cut section and to frame the opening, which is why Step 4 comes first. A crew working blind against a finished wall risks cracking drywall well beyond the work zone. Plastic sheeting, a zipped dust barrier, and floor protection are cheap insurance for carpet and paint you want to keep.
Step 6: Set, Seal, and Insulate the New Egress Window in Your Finished Basement
Set the window on a prepared base, not bare block. Setting the unit on a mortar bed seals the bottom joint and creates a sloped sill that sheds water away from the frame. It takes longer than dropping the window on block, and it is worth the time in a finished space where a slow leak hides behind drywall until mold shows up.
Frame the rough opening with pressure-treated lumber padded to the exact size the window needs, then set and shim the unit level and square. Outside, seal the joint between the window frame and the surrounding masonry before any stucco or finish work goes on. Inside, spray foam the gap between frame and framing.
The water question is the real DIY risk, more than the carpentry. In an unfinished basement, a small seal failure shows itself on bare concrete and gets fixed. Behind a finished wall, the same failure soaks insulation and drywall for months first. If you are weighing DIY materials against a pro install, weight the sealing steps heavily; that is where the price difference buys something real.
Step 7: Install the Window Well and Restore Drainage
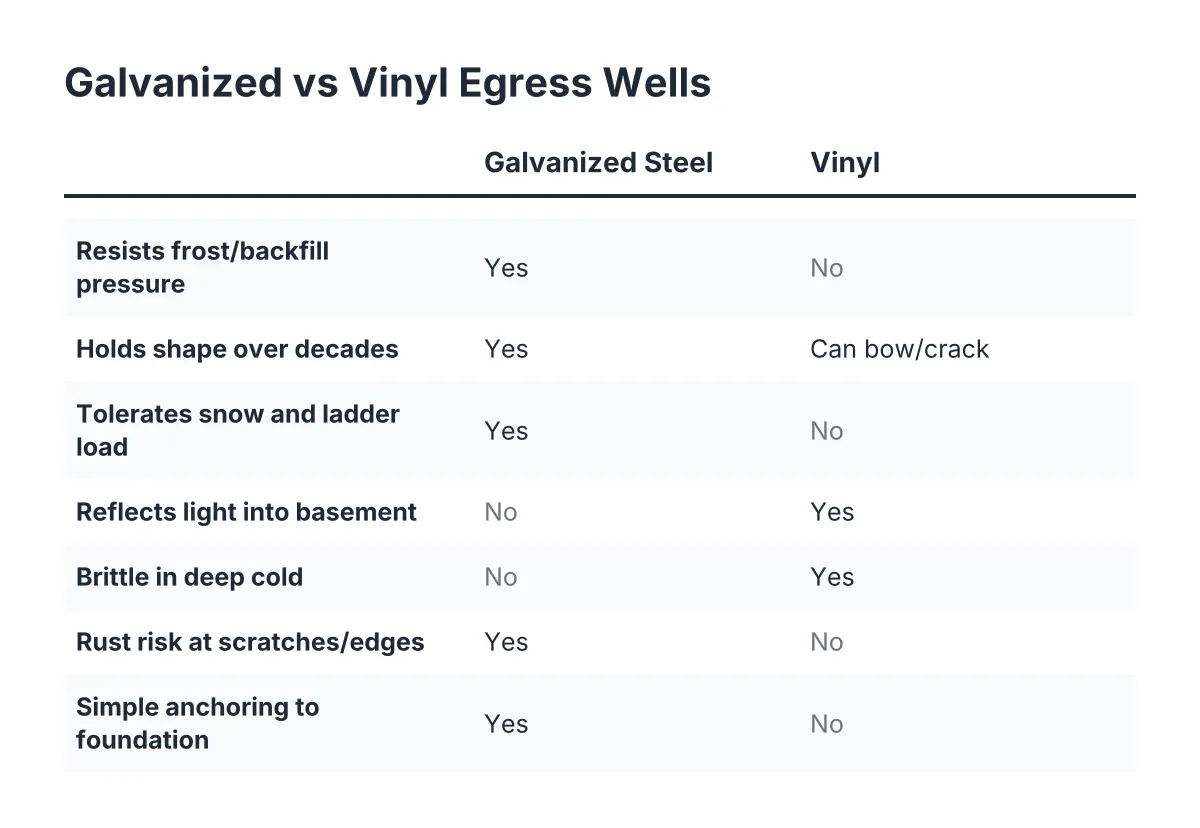
Attach the well to the foundation, backfill, and confirm drainage before closing anything up inside. Galvanized egress window wells handle Minneapolis frost cycles well and bolt directly to the foundation wall. Set the well on a gravel base that drains, and keep the well floor below the window sill. Adding an egress window and well together runs about $3,900 on average, according to Angi, though site conditions in older Twin Cities foundations push projects in both directions.
Deeper wells need a fixed ladder or steps, and a cover keeps snow, leaves, and kids out without blocking escape.
Step 8: Patch the Interior and Pass Inspection
Finally, close up the interior. Insulate the disturbed wall section, patch drywall to the studs you exposed in Step 4, tape, mud, and reinstall the saved trim. Because the opening was planned to land on stud centers, the patch seams fall where tape and paint hide them. Schedule the final inspection before the wall is fully closed if your inspector wants to see insulation and sealing.
This finish stage is also where finished basement windows diverge from the same work in an unfinished space. In an unfinished basement you can skip interior trim entirely once the window is sealed. In a finished room, the trim-out is half the visible result, and rushed finish work announces itself every time you walk past.
Where DIY Ends and a Pro Starts on a Finished-Basement Egress Project
For the DIY-curious homeowner, here is a fair split. Demo, drywall patching, painting, and trim are reasonable weekend work for someone comfortable with basic carpentry, and mistakes there are visible and fixable. Cutting the foundation, waterproofing the frame-to-masonry joint, and building the well drainage are the steps where a mistake stays hidden until it costs real money. Installing an egress window costs an average of $4,229 nationwide, according to HomeAdvisor, and a meaningful share of that price is the cutting and sealing you cannot easily redo.
Therefore, many Minneapolis homeowners split the project: hire out the egress window installation, then finish the interior patching themselves. If your foundation shows existing cracks, bowing, or water staining near the planned opening, bring in a professional to evaluate it before anyone cuts; that is not a judgment call to make from a video. Get a written quote that spells out who handles the permit, the cut, the well, and the interior patch, so nothing falls in the gap between your work and theirs.
If you need basement egress window installation, Minneapolis Window Pros can help.
Prefer to talk it through? Call (612) 482-9787 — a quick call is usually the fastest way to get a straight answer for your situation.