How to Install Basement Window Blocks in a Finished Basement the Right Way
Cracked or foggy block windows are one of the most common problems in older Minneapolis basements, and hardware store kits rarely tell you what you actually need to know before you buy one. If you want to install basement window blocks in a finished basement correctly, you need three things the kit box does not explain: why the old window failed, whether your opening matches a standard size, and how to seal the new unit so water stays out. This guide explains how to block windows in a finished basement step by step, so you can decide whether it is a weekend project or one worth handing to a local installer.
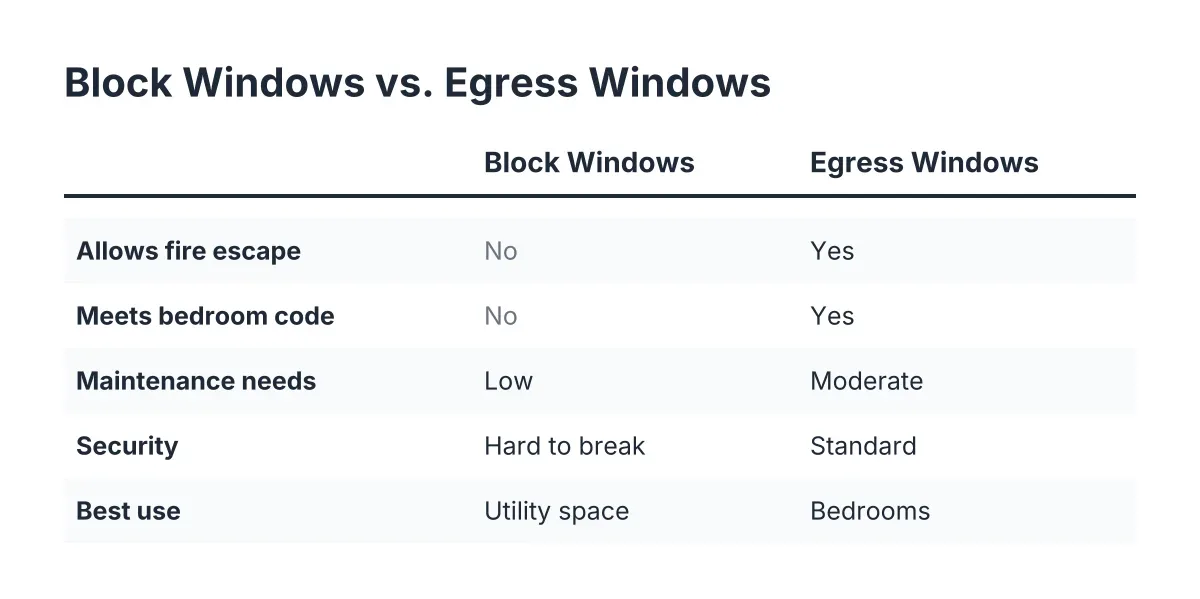
One note before the steps. Glass block is a fixed window. It does not open. That matters in a finished basement, because if the room is a bedroom, Minneapolis code requires an operable egress window instead. We cover that decision in Step 2, because getting it wrong can fail inspection or hold up a sale.
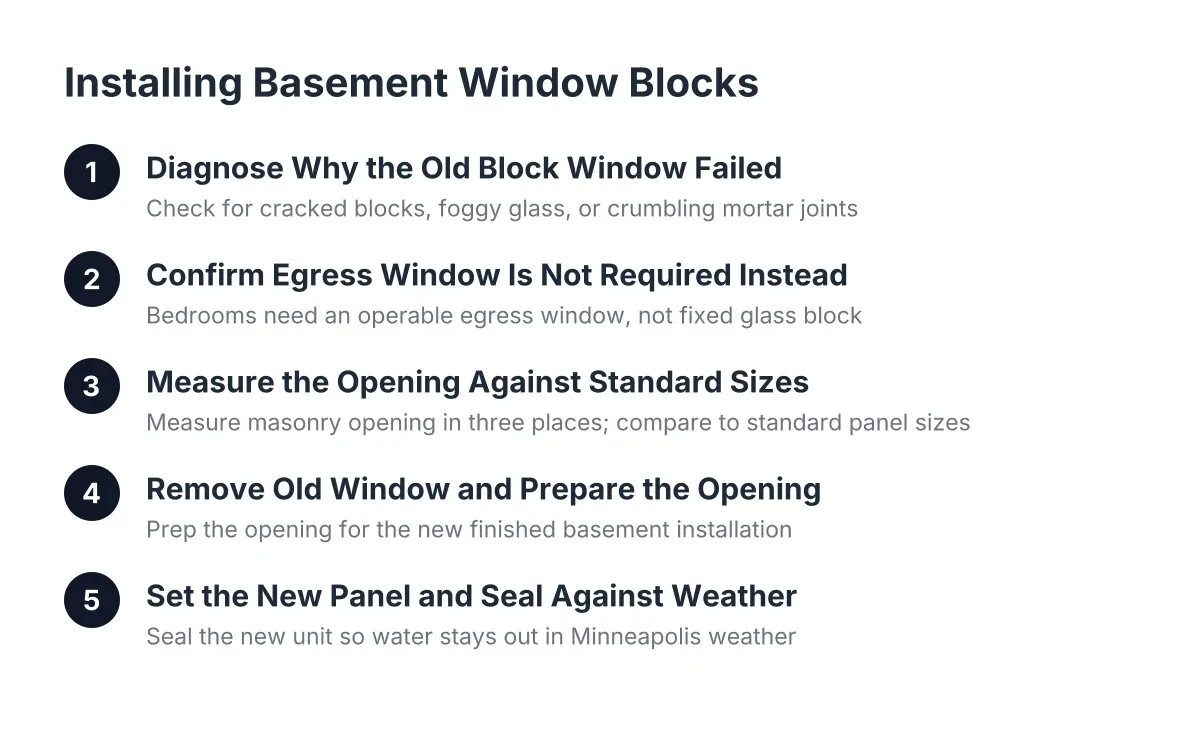
Step 1: Figure Out Why the Old Block Window Failed
Start by diagnosing the failure, because it changes what you buy and how you prep the opening. Block windows in Minneapolis homes usually fail in one of three ways, and each one tells you something different.
- Cracked blocks. Usually caused by foundation settling, frost heave, or an impact. If the crack follows a mortar joint, the panel shifted. If it runs through the glass, something hit it or the wall is moving.
- Foggy or hazy glass. Individual glass blocks are sealed units. When the seal fails, moisture gets inside the block and there is no foggy glass block window fix that lasts. You cannot polish it out. The block, or more practically the whole panel, gets replaced.
- Crumbling mortar joints. Decades of freeze-thaw cycles break down mortar. If the blocks are sound but the joints are failing, repointing is possible, but on a panel that old the glass seals are usually next.
Here is the honest answer most articles skip: cracked basement window block repair is rarely worth it. A single block cannot be swapped out cleanly because the panel is mortared as one unit. Once one block fails, replacing the full panel costs about the same as a repair attempt and resets the clock on the whole window.
While you are down there, check the surrounding concrete. Spalling, wide cracks radiating from the corners of the opening, or a sill that slopes toward the house are signs the problem is bigger than the window. That is a moment to consult a pro before spending money on glass blocks.
Step 2: Confirm the Room Does Not Need an Egress Window Instead
Before you buy anything, confirm that glass block is legal for this room. A finished basement bedroom cannot use a fixed block window as its only window. Minneapolis code requires each bedroom below the fourth floor to have a window at least 20 inches wide by 24 inches high, with nothing blocking it, according to the City of Minneapolis. Glass block does not open, so it cannot meet the bedroom egress requirement.
For sleeping rooms, the standard is stricter than just size. IRC egress code calls for a minimum net clear opening of 5.7 square feet, plus a window well that projects at least 36 inches from the house with a nine square foot footprint, according to HomeAdvisor. That is a basement egress window and egress window well project, which means cutting the foundation opening larger, not filling it with block.
Therefore, the decision tree looks like this:
- Laundry room, utility room, or storage area: glass block is fine and adds security.
- Finished rec room or family room: glass block is usually fine, as long as the basement as a whole meets light and ventilation requirements.
- Bedroom or any room someone sleeps in: you need an operable egress window, full stop.
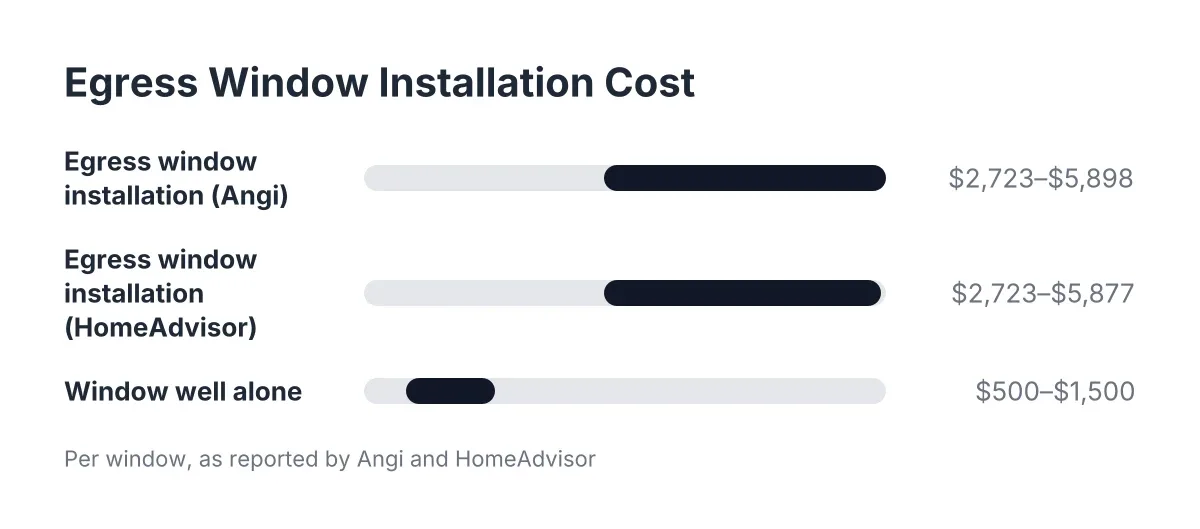
For scale, installing an egress window costs an average of $4,229, with most homeowners spending between $2,723 and $5,877, according to HomeAdvisor. That is a different project than a block window swap, and it is not a DIY job for most homeowners because it involves cutting structural concrete.
Permits vary by scope. A like-for-like basement window replacement in the same opening often does not need one in Minneapolis, but enlarging an opening or adding a bedroom window does. A quick call to Minneapolis 311 or the city's construction services desk settles it before you start.
Step 3: Measure the Opening Against Standard Block Sizes
This is where hardware store kits burn people. Pre-assembled glass block panels come in a short list of standard sizes, and older Minneapolis foundations were not poured with those sizes in mind. Measure the actual masonry opening, not the old frame, in three places: left side, center, and right side. Do the same for width. Openings in 1920s to 1950s foundations are rarely square.
Common basement window block sizes for pre-made panels run in increments built from standard 8-inch and 6-inch blocks. Typical panels are 32 by 14, 32 by 24, or 24 by 16 inches. Your opening needs to be about a half inch to an inch larger than the panel in each direction to leave room for the mortar bed.
However, if your measurements land between standard sizes, you have three options:
- Order a custom-built panel from a glass block supplier, which costs more and takes longer.
- Build the panel in place block by block, which is the traditional method and the hardest skill in this whole job.
- Fur the opening down with mortar or a pressure-treated buck to fit a standard panel, which works but adds a failure point if done sloppily.
An example: a homeowner in the Longfellow neighborhood measures a 30 by 15 inch opening in a 1948 foundation. No stock panel fits. The kit aisle at the big box store has nothing helpful, and the return line is where a lot of DIY block projects quietly end. Knowing your size before you shop saves that trip.
Step 4: Remove the Old Window and Prepare for a New Finished Basement Installation
Removing the old panel is demolition, but controlled demolition. The goal is a clean masonry opening with intact edges, because the new mortar bond is only as good as the surface it grips.
Work from inside if the basement is unfinished at that wall, or from the window well outside if drywall is in the way. Wear safety glasses and gloves; broken glass block is sharp on every edge. Score the perimeter mortar joint with a grinder and masonry blade, then break out blocks with a small sledge and cold chisel, starting from the center and working outward. Chisel the old mortar back to clean, sound concrete on all four sides.
In a finished basement, protect the room first. Tape plastic sheeting over the work area, pull back carpet near the wall, and expect dust anyway. Concrete grinding dust travels farther than plastic sheeting suggests, which is one reason homeowners with new finished spaces often hire this step out.
Step 5: Set the New Panel and Seal It Against Minneapolis Weather
Setting the panel is a one-hour job that determines whether you get twenty dry years or a wet wall by spring. Mix Type S mortar to a peanut butter consistency. Lay a full mortar bed on the sill, sloped slightly toward the exterior so any water that reaches the joint drains out, not in.
Set the panel on the bed, then pack mortar into the side and top joints, working it in fully with a tuck pointer. Voids in these joints are where frost gets a grip. Strike the joints smooth, let the mortar cure, then seal the exterior perimeter with polyurethane or silicone masonry caulk rated for our freeze-thaw swings. Skip the painter's caulk; it will split by February.
Outside, check the grade and the window well. If the window sits below grade, the well needs gravel at the bottom for drainage and soil graded away from the house. A perfect mortar job fails if the well fills with water every thaw. Galvanized wells hold up well against Minneapolis soil pressure and frost depth, and window well installation as a standalone fix runs anywhere from $500 to $1,500 or more, according to Angi.
DIY or Hire It Out: The Honest Comparison
The materials math favors DIY, and the risk math often does not. A stock panel, mortar, caulk, and blade will cost a fraction of a professional install, and pricing on the pro side varies by project, so a free quote is the only way to know your real number. The trade-off is not money, it is water. A gap in a mortar joint or a mis-sloped sill does not announce itself; it shows up months later as a damp carpet edge or a moldy stud bay behind finished drywall.
Handle it yourself if the opening matches a standard panel, the concrete is sound, the room is not a bedroom, and you have laid mortar before. Bring in a local installer when the opening is odd-sized, the foundation shows movement, the wall is already finished, or the room needs to convert to a legal bedroom with a basement egress window and well. That last case is not a block window job at all, and no kit will get you there.
Either way, you now know the two things the kit box never says: why block windows fail, and whether your opening will accept a standard panel. Measure first, check the room's code status second, and the rest of the project follows from there.
If you need basement egress window installation, Minneapolis Window Pros can help.
Related guide: basement window blocks — Complete Guide
Prefer to talk it through? Call (612) 482-9787 — a quick call is usually the fastest way to get a straight answer for your situation.