Basement Window Replacement in a Finished Basement: A Step-by-Step Checklist
Swapping a basement window in an unfinished space is forgiving work. Doing finished basement window replacement in a finished room is different. You have drywall, trim, flooring, and maybe a built-in bench sitting inches from the opening. Get the order of operations wrong and a one-day window job turns into a drywall and paint project. This guide walks through the swap step by step, with a contractor's checklist up front for deciding when a repair will not cut it and full replacement is the right call.
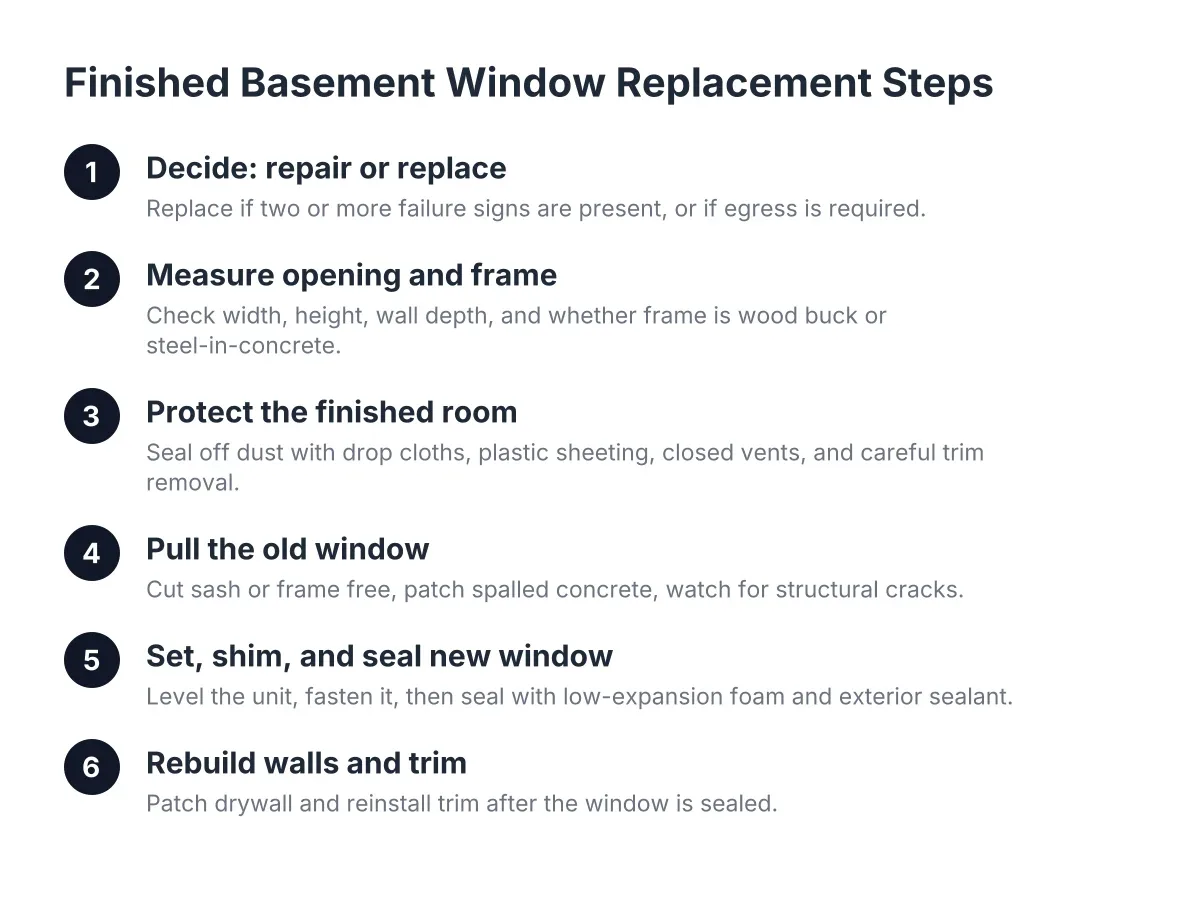
Step 1: Decide Whether Repair Will Actually Cut It
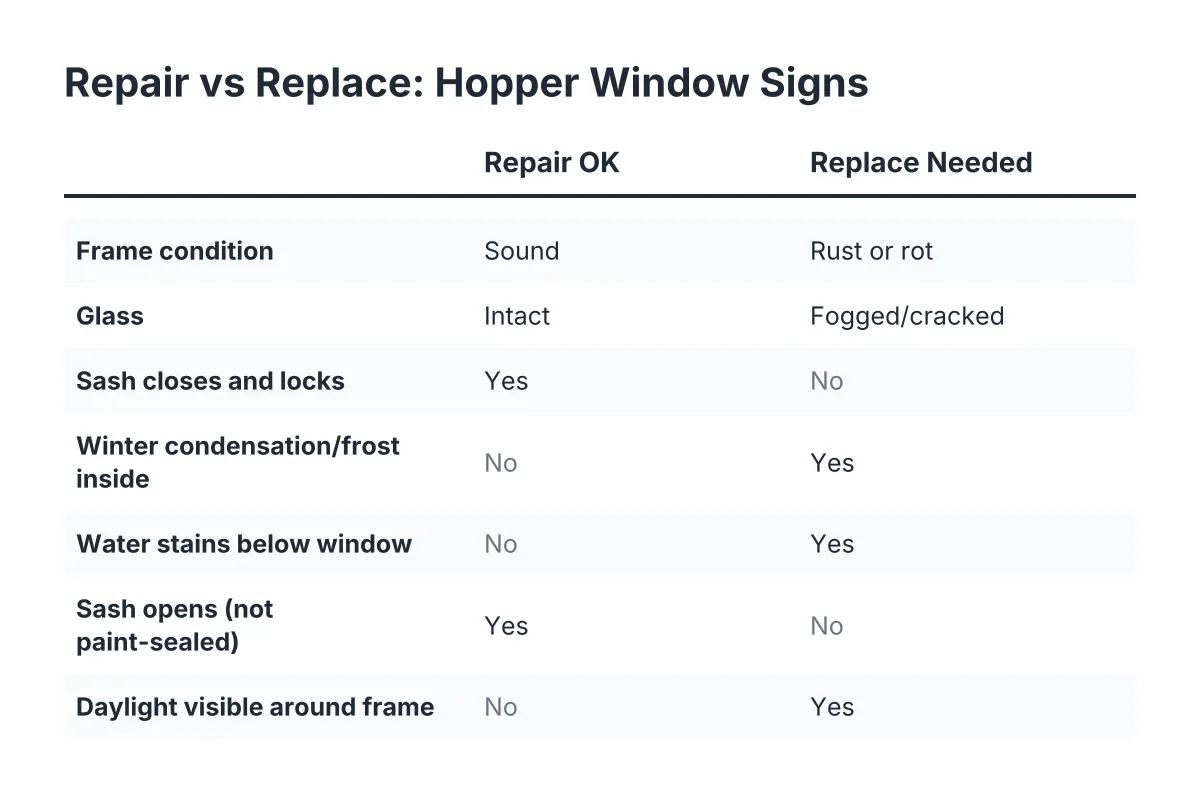
A repair makes sense only when the frame is sound and dry. First, run this checklist against your window. If you hit two or more of these, replacement is the smarter spend, especially when finished walls are at stake:
- Fogged or cracked glass block that lets in moisture, not just less light
- A steel frame rusted where it meets the concrete, with staining running down the wall below
- Soft, crumbling, or flaking concrete around the opening
- A hopper or slider that no longer latches, so cold Minneapolis air pours in all winter
- Water stains or peeling paint on the drywall return around the window
- A basement you plan to use as a bedroom, which triggers the bedroom egress requirement
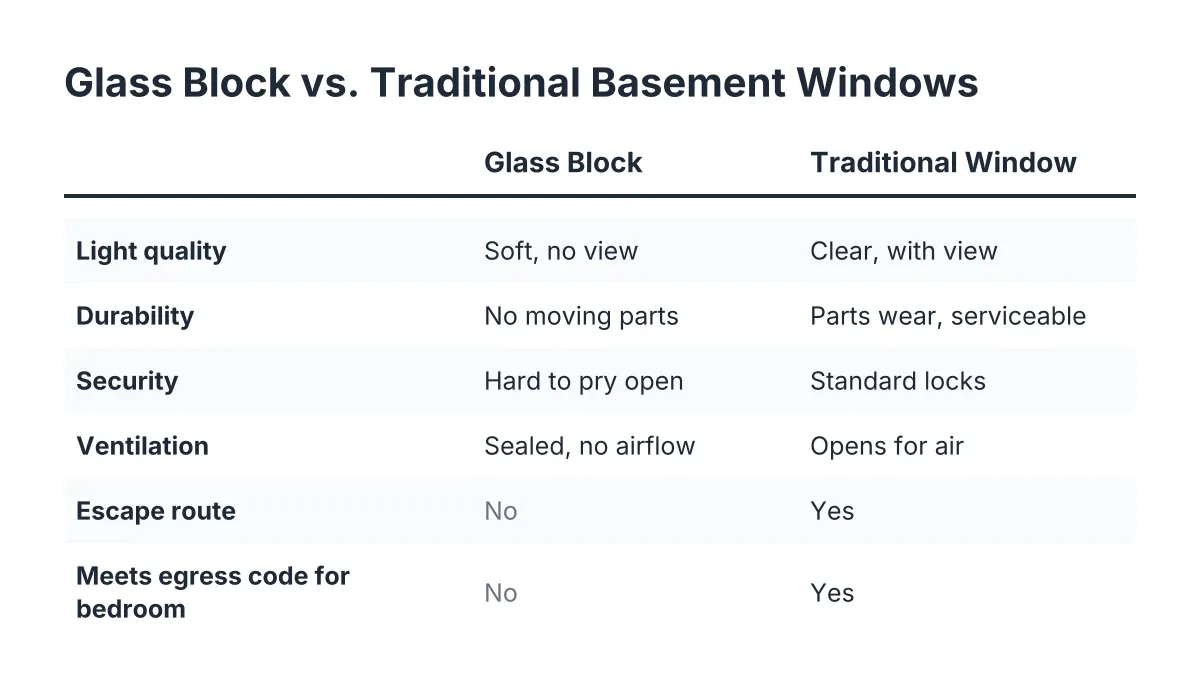
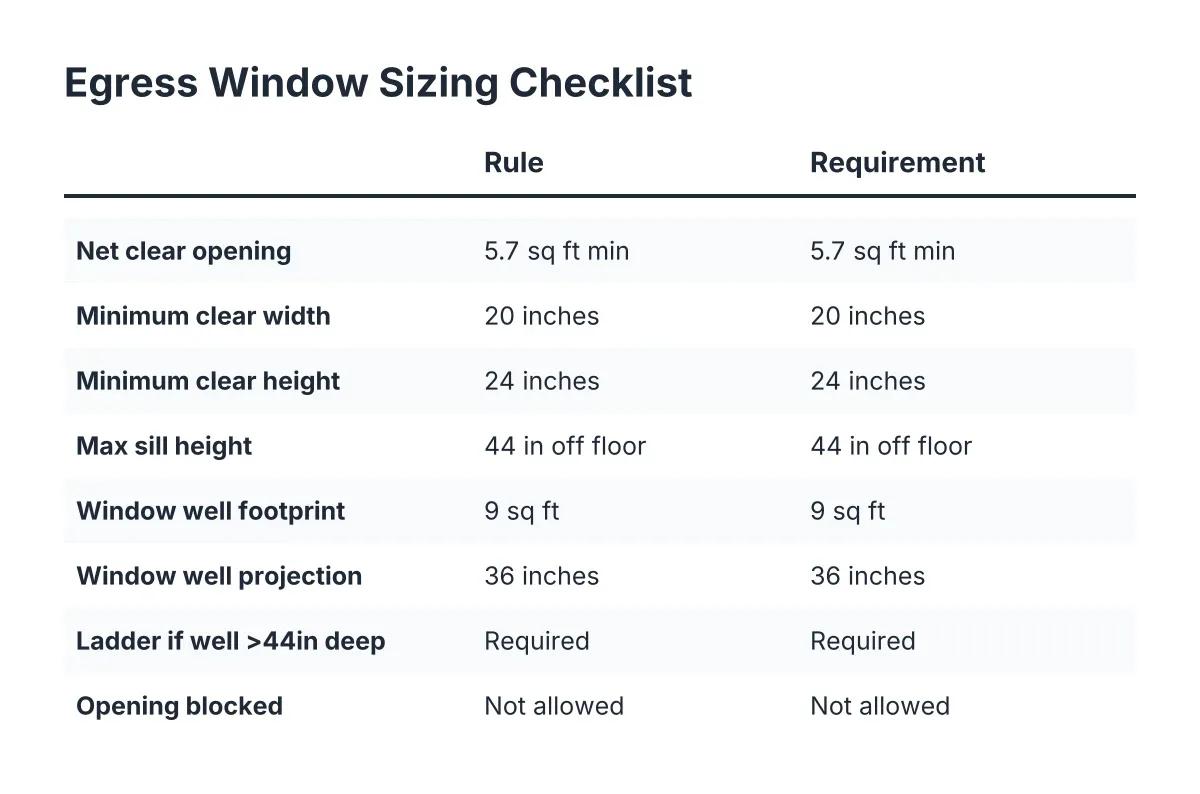
That last one matters. If the finished room will be a sleeping room, a small hopper will not pass. Minneapolis code requires each bedroom below the fourth floor to have a window at least 20 inches wide by 24 inches high with nothing blocking it, according to the City of Minneapolis. In that case you are not repairing anything; you are planning an egress window with a window well, which is a bigger job than a same-size swap.
Here is the trade-off to be honest about. Repair is cheaper this year. However, patching a failing window behind finished drywall means that when it does fail, the water damage shows up in your flooring and wall first, and the fix costs more than the window would have.
Step 2: Measure the Opening and Frame Before You Open a Wall
Measure the existing window from the interior: width and height of the frame, plus the depth of the wall from drywall face to exterior concrete. Then check whether the frame sits in a wood buck or is steel cast directly into the foundation. Many pre-1990 Minneapolis homes have steel frames set in the concrete, and those are stubborn to remove.
This is where DIY comparisons get murky. Hardware store kits assume a standard opening, and plenty of older foundations are not standard. The working rule is to order the new window slightly smaller than the rough opening in both directions, so you have room to shim it level and square. Order to the exact concrete dimension and you may not get the window in at all.
If your opening is an odd size, you have two paths: a custom-sized unit, or padding the opening with pressure-treated lumber to fit a stock size. Pressure-treated matters anywhere wood touches concrete; This Old House notes that the bottom plate of basement framing must be pressure-treated for exactly this reason, and the same logic applies to window bucks.
Step 3: Protect the Finished Room Before Demo Starts
Removing an old basement window throws concrete dust, rust flakes, and insulation into the room. In an unfinished basement, you sweep it up. In a finished one, that dust settles into carpet and HVAC returns. Before pulling anything:
- Lay drop cloths or rosin paper from the window to the nearest door, taped at the seams.
- Tape plastic sheeting over the wall around the window and across the doorway to contain dust.
- Close HVAC supply and return vents in the room.
- Remove interior trim and the drywall return carefully with a utility knife and flat bar, scoring the paint line first so you do not tear the face paper on the surrounding wall.
Set the trim aside labeled if it is in good shape. Reusing original trim saves a trip to match profiles later.
Step 4: Pull the Old Window Without Wrecking the Opening
Cut the sash or glass block free first, then address the frame. Wood and vinyl frames usually come out with a reciprocating saw cut through the frame, then prying the pieces inward. Steel frames cast into concrete take longer: cut the frame in sections and work each piece loose, keeping your pry bar off the drywall edge you just protected.
As a result of pulling an old frame, you will often find gaps or spalled concrete around the opening. Patch these with rapid-setting concrete and let it cure before setting the new unit. A clean, solid perimeter is what the sealant bonds to; skipping the patch is the most common reason a swap leaks a year later.
One honest caution: if removing the frame reveals a horizontal crack in the foundation wall, or the sill area crumbles deeper than surface spalling, stop and get a professional opinion before installing anything. The same goes for any plan to enlarge the opening. Cutting foundation concrete is the one phase where a mistake affects the structure, not just the window.
Step 5: Set, Shim, and Seal the New Window
Dry-fit the window first. Then set it on shims, check level and plumb, and adjust until the reveal is even on all sides. Alignment is not cosmetic here; a window racked out of square leaks air now and water later, and in a finished basement that water travels behind drywall before you see it.
Fasten per the manufacturer's instructions, then seal the gap between frame and concrete with low-expansion spray foam on the interior and exterior-grade sealant outside. Low-expansion matters. Standard foam can bow a vinyl frame inward and keep the sash from closing.
For an unfinished basement, you could stop here and just trim the cured foam flush. In a finished room, the foam is the midpoint, not the finish line.
Step 6: Rebuild Walls and Install Trim After Finished Basement Window Replacement
Now reverse the demo. Rebuild the drywall return or install extension jambs to bring the window frame flush with the finished wall plane. Reinstall or replace the casing, fill nail holes, caulk the trim-to-wall joint, and paint. If the old window was larger than the new one, you will frame and patch the difference, and the patch seam should land on solid backing so it does not crack.
Budget time honestly. Suppose a homeowner in South Minneapolis is swapping two foggy glass block windows in a finished family room. The window work itself might take a day. The drywall patching, two coats of mud with drying time, priming, and painting add two to four more days of calendar time, even if the labor hours are modest. This is why timing matters: schedule basement window replacement in a finished space before new flooring and paint, not after, whenever your remodel sequence allows it.
Step 7: Run the Finished-Basement Final Checks
Before you call the work done, check these:
- Window opens, closes, and locks smoothly with no rubbing
- No daylight visible at the perimeter from inside with the lights off
- Hose test outside: spray the window for a few minutes, then check the interior for moisture
- Exterior sealant is continuous, with no gaps at the corners
- If a window well is involved, the drain runs clear and gravel sits below the window sill
- If the room is a bedroom, confirm the opening meets the egress code compliance numbers before the drywall closes anything in
When the Swap Becomes an Egress Project
If your finished basement plan includes a bedroom, a same-size swap will not get you to code compliance, and the scope changes. Adding an egress window means cutting the foundation, excavating outside, installing a window well with a drain, and framing a larger opening. According to HomeAdvisor, installing an egress window averages $4,229, with most homeowners spending between $2,723 and $5,877, and IRC egress code calls for a well projecting at least 36 inches from the house with a 5.7 square foot net clear opening.
That is not a weekend DIY project, and it is where egress replacement windows in Minneapolis differ from a simple hopper swap: frost depth, soil, and well drainage all have to be handled right or the well becomes a bathtub against your foundation. For a straight same-size swap in a finished room, a careful DIYer can do good work if the frame comes out clean and the opening is standard. The honest dividing line is concrete cutting, drainage, and anything touching the bedroom egress requirement. Pricing varies by project either way, so get a free quote on the full-scope version before deciding; comparing a real number against your DIY materials list is the only comparison that means anything.
If you need basement egress window installation, Minneapolis Window Pros can help.
Prefer to talk it through? Call (612) 482-9787 — a quick call is usually the fastest way to get a straight answer for your situation.