First Floor Window Installation vs. Basement: A Step-by-Step Scope Guide
If you are handy and comparing quotes, you have probably noticed that first floor window installation gets treated like the "easy" job while basement work carries a bigger price tag. That gap is real, and it comes down to scope. A first-floor window swap is mostly carpentry and sealing. A basement window job can involve concrete, digging, drainage, and code rules for bedroom egress. Understanding the full basement window installation scope helps you decide what you can handle yourself and where to hire out.
This guide walks through both jobs step by step so you can see exactly where the work differs. By the end, you will know which parts a handy Minneapolis homeowner can reasonably handle, and where the job stops being a weekend project.
Step 1: Identify Which Job You Actually Have
Start by naming the project honestly, because the two jobs share almost nothing past the word "window."
A first-floor project is usually one of two things. An insert replacement puts a new window inside the existing frame; a full-frame replacement strips the opening down to the rough framing. Either way, you are working in a wood-framed wall, at a comfortable height, with siding and trim you can see and reach.
A basement project splits into three types:
- Like-for-like basement window replacement: pulling an old hopper or slider out of a concrete or block opening and setting a new unit the same size.
- Glass block window installation: mortaring block windows into the opening, common on older Minneapolis homes where security and privacy matter more than ventilation.
- Egress window installation: cutting the foundation to enlarge the opening, excavating outside, and adding a window well so the basement can legally hold a bedroom.
If your project is the third type, plan on permits and inspections. If it is the first type in an unfinished basement, it may genuinely be the weekend project you are hoping for.
Step 2: Measure the Opening and Check What Surrounds It
Next, measure width and height in three places each and record the smallest numbers. On the first floor, you are measuring inside the existing frame for an insert, or the rough opening between studs for a full-frame replacement.
In the basement, the rules shift. Replacement basement windows should run slightly smaller than the existing opening in both directions so you have room to shim and seal. Hardware store block window kits rarely mention this, and older Minneapolis foundations often have openings that match no standard kit size. Installers commonly leave the concrete opening a few inches oversized, then pad it out with pressure-treated lumber to hit the exact rough opening the window needs. The practical basement window installation scope often requires this kind of field adjustment.
Also look up. Floor joists sit on either side of most basement openings, which limits how much wider the opening can go. That is why egress projects usually cut the foundation deeper rather than wider.
Step 3: Basement Window Installation Scope and Code Requirements
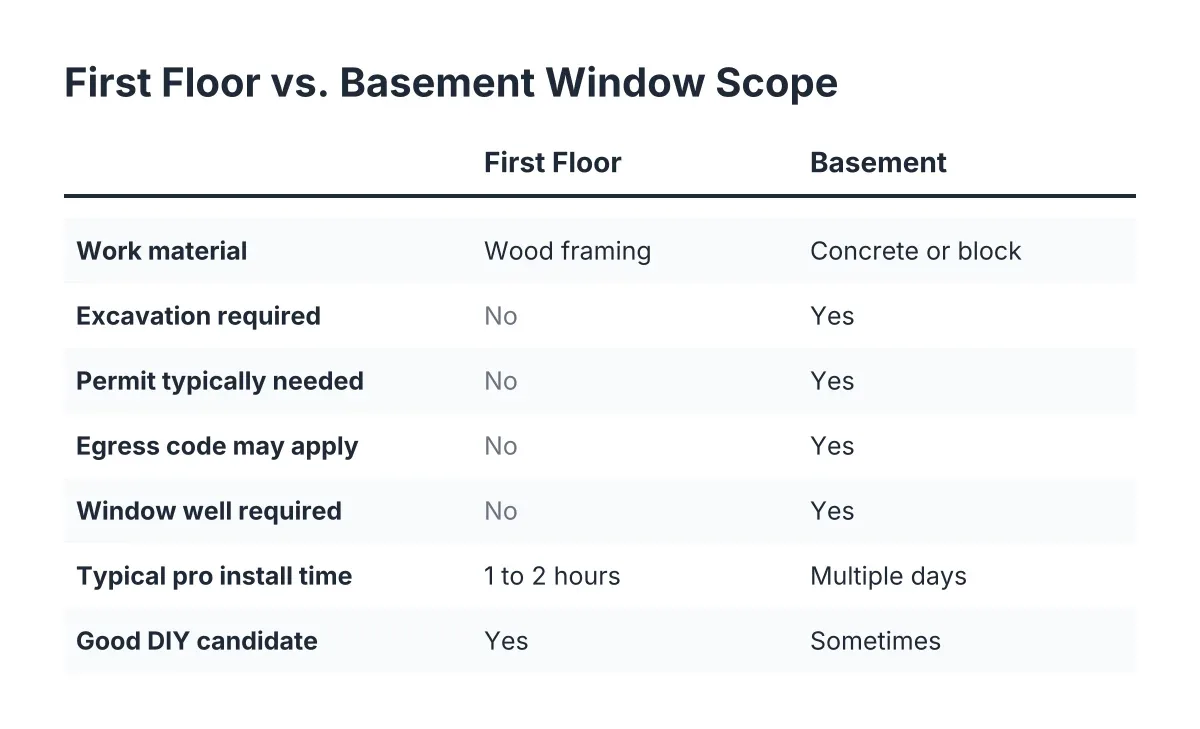
This step is where basement work pulls far ahead of first floor window installation in complexity. On the first floor, a same-size replacement in a non-bedroom room usually raises no code questions.
Basements are different. If the room will be a bedroom, it must meet the bedroom egress requirement. Minneapolis code requires each bedroom below the fourth floor to have a window at least 20 inches wide by 24 inches high, with nothing blocking it, according to the City of Minneapolis. On top of that, IRC egress rules call for a net clear opening of at least 5.7 square feet, plus a window well that projects at least 36 inches from the house with a nine-square-foot footprint, according to HomeAdvisor.
An old hopper window meets none of that. So a basement bedroom project is never a window swap; it is a foundation alteration with a permit, an inspection, and excavation. A DIY job that skips the permit can fail at resale, which is one of the most expensive ways to save money.
Step 4: First Floor Window Installation Details
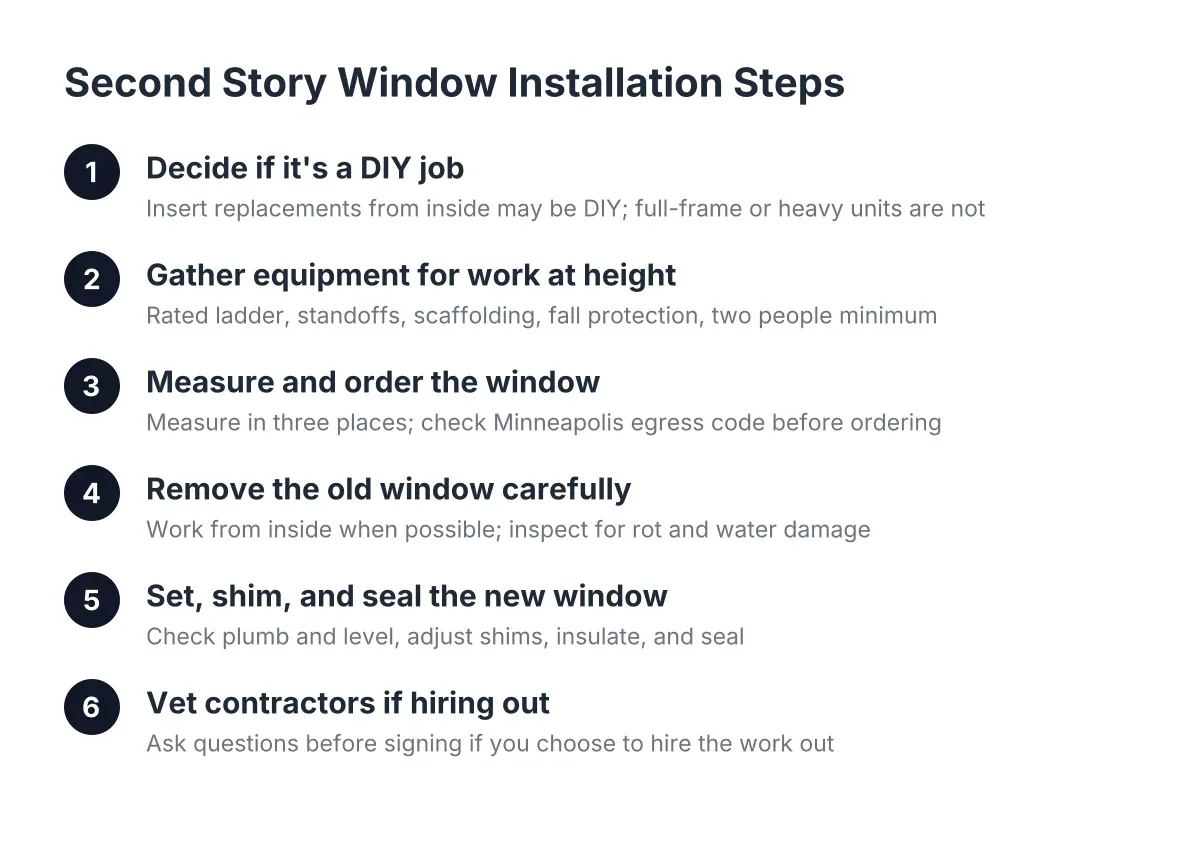
Now compare the actual work. A typical first-floor insert replacement goes like this:
- Remove the interior stops and the old sash.
- Clean the frame and check the sill for rot; repair before proceeding.
- Dry-fit the new unit, then set it in a bed of sealant.
- Shim it plumb, level, and square, and check sash operation before fastening.
- Insulate the gaps with low-expansion foam, then reinstall stops and caulk the exterior.
A full-frame replacement adds siding or trim removal, new flashing, and a proper sill pan. That is where DIY first-floor jobs go wrong most often; poor flashing lets water into the wall cavity, and you will not see the damage for years. Signs of poor window installation, like drafts, fogging between panes, or sashes that stick, usually trace back to skipped shimming or bad sealing rather than a bad window.
The whole job for one first-floor window often takes a pro one to two hours. Height, access, and finish trim are the main variables.
Step 5: Full Scope of Basement and Egress Installation Work
By contrast, here is what a full egress window installation involves:
- Pull the permit and mark utility lines.
- Excavate outside the foundation, typically several feet down.
- Cut the concrete or block wall to the new opening size, usually deeper, not wider, because of the joists above.
- Frame the opening with pressure-treated lumber and set the window plumb and level.
- Insulate around the unit with spray foam and seal the exterior.
- Install a drain at the base of the excavation, then set the window well against the foundation.
- Backfill with gravel, secure the well, and schedule inspection.
The concrete cut is the highest-stakes step. A clean, accurate cut lets the window fit and seal correctly without weakening the wall. A sloppy cut invites water intrusion, and in Minneapolis clay soil with a deep frost line, water finds every gap. Galvanized wells hold up well against frost heave here, which is why they are the common choice. The full basement window installation scope for an egress project requires careful planning at every stage.
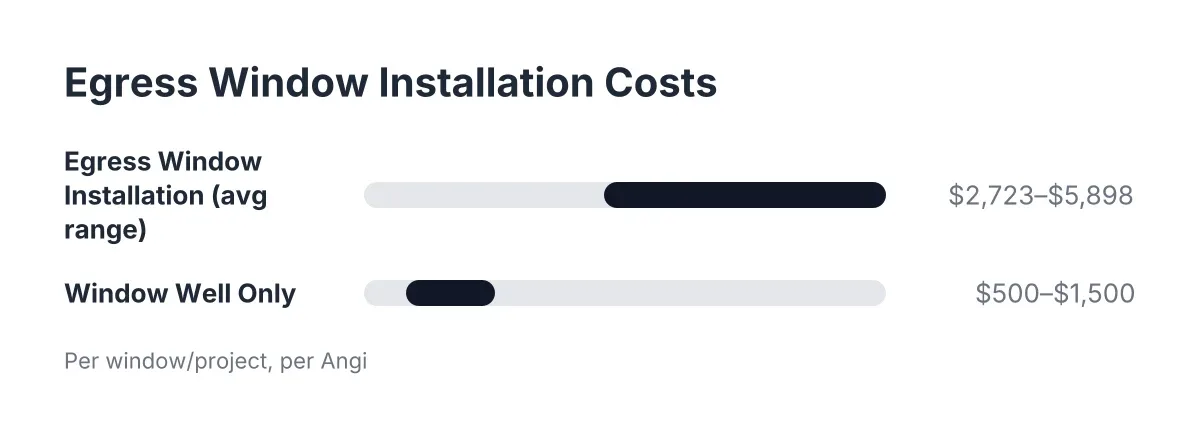
Cost reflects that scope. Adding an egress window and well runs about $3,900 on average, according to Angi, while HomeAdvisor puts the average egress window installation at $4,229, with most homeowners spending between $2,723 and $5,877. Window well replacement alone averages $2,200, according to HomeAdvisor. Compare that to a standard window installation cost on the first floor, and the difference is almost entirely digging, concrete, and drainage, not the window itself.
Step 6: Decide Which Parts to DIY and Which to Hire Out
Here is the honest split for a handy homeowner. An unfinished basement is a forgiving place to practice; imperfect trim work stays out of sight, and the only requirement that matters is keeping water out. Replacing a broken window in an unfinished basement can even skip interior trim entirely once the unit is insulated and sealed.
Suppose a homeowner in Longfellow is finishing a basement and finds two cracked glass block windows plus one old hopper in the future bedroom. In that scenario, a reasonable split is to DIY the block windows, since mortaring blocks into a sound opening is patient work rather than hard work, and hire a window installer for the egress opening. The concrete cut, the window well installation, the drain, and the inspection are where a mistake costs thousands.
Hire out the job when any of these apply:
- The opening needs to be enlarged, meaning concrete cutting.
- The room must meet the bedroom egress requirement.
- The basement is already finished, where a leak means ruined drywall and flooring.
- You see existing water staining or efflorescence around the opening.
One more trade-off worth naming: even a well-done DIY install can complicate a manufacturer warranty claim, since some warranties require professional installation. Read the fine print before you order the unit, and when in doubt about structure or drainage, bring in a professional to at least look at the opening.
Step 7: Time the Project and Get Real Numbers
Finally, plan the schedule. First-floor swaps happen year-round in Minnesota; crews work one opening at a time so the house is never open for long. Egress work is easier when the ground is not frozen, so spring through fall is the practical window for excavation, though winter cuts are possible with the right equipment.
Pricing varies by project, so get itemized quotes rather than a single number. Local window installation contractors near me searches will surface plenty of names, but the useful quote is the one that separates the window, the concrete work, the well, and the drainage so you can compare it against your own DIY materials list. Most local installers, including us, offer a free quote, which costs you nothing but an hour and gives you a real number to compare against the hardware store cart. Suppose your DIY materials list for one egress opening comes to roughly a third of the professional quote; that gap is what you are paying for the cut, the drain, and the inspection sign-off, and for most homeowners that is money well spent on the one part of the job that cannot be redone cheaply.
If you need basement egress window installation, Minneapolis Window Pros can help.
Related guide: window installation — Complete Guide
Prefer to talk it through? Call (612) 482-9787 — a quick call is usually the fastest way to get a straight answer for your situation.